Hero Image by PIRO from Pixabay
AWS Private and Public Subnets
Introduction
Hello my friends!
This is a step by step guide on how to implement two AWS subnets, one private and one public, using Terraform, our beloved IaC tool.
Important Note: If you follow along with the instructions in this blog post and create resources in your
AWS account, make sure that, at the end, all the resources are destroyed using the command terraform destroy. Otherwise, some of the resources created might incur charges to your AWS account.
Show me The Code
All the Terraform code used to implement the small demo project for this blog post is given here. You can use the different tags to follow along the steps presented below. In any case, I am providing gists with the code snippets as you move on reading.
Differences between private and public subnets
What are the main functional differences between the two categories of subnets?
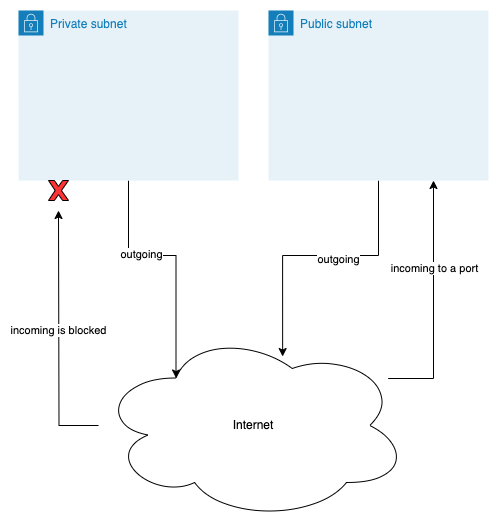
Private subnets host machines that cannot be accessed from the outside world. So, they don't have a public IP address. They only have a private one. But, we usually still want these machines to be able to access Internet, i.e. to generate outgoing traffic. For example, when we want to install a software package on a private machine, we want the machine to be able to access public Internet in order to download the software package binaries.
Public subnets on the other hand, they host machines that can be accessed from the outside/Internet world. These machines have public IP addresses and DNS names. They usually have one or more ports open so that one can initiate a connection to them. For example, a machine that is hosting a Web server, it has a public IP and, possibly, at least one of the ports 80 (
http) and 443 (https) open.
In summary, private subnets usually allow outgoing traffic but do not allow incoming traffic. Whereas, public subnets allow both outgoing and incoming traffic.
Objective
Our objective is depicted in the following picture:
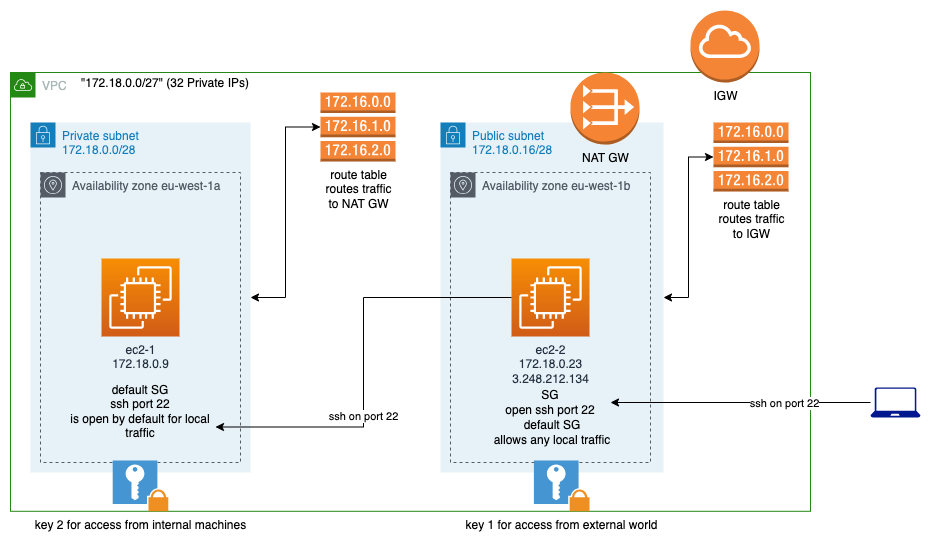
You don't have to understand this diagram from the beginning. We will break the development process in simple 9 steps, starting from a blank page and ending by having all of the elements in place.
But, first, some preparation work on our local machine.
Prepare your local machine
Create working folder
Create a working folder, e.g. private-public-subnets
$ mkdir private-public-subnets
and cd to this folder. This is going to be our working folder moving forward.
Install necessary tools
The following are the necessary tools for this project to work:
Configure tools
Use the instructions here to configure an AWS profile. Then expose its name as the value of the AWS_PROFILE environment variable.
Initialize terraform
Inside the root folder, create the file
This is the main terraform file that will be used for initializing the repository.
With the main.tf file in place run the following command to initialize terraform:
$ terraform init

Initializing the backend...

...
Initialize AWS terraform provider
Next, you need to create two files:
File locals.tf:
which declares a couple of locals, the project and the region.
Set the values of these two local values to whatever values you prefer. The most important one is the
region, which specifies the AWS region you want the resources to be created in.
Next file is providers.tf
This defines the region and default tags that will be used for all resources that we are going to create to AWS.
Step 1 - VPC
We are ready to provision the first AWS resource, the VPC - Virtual Private Cloud.
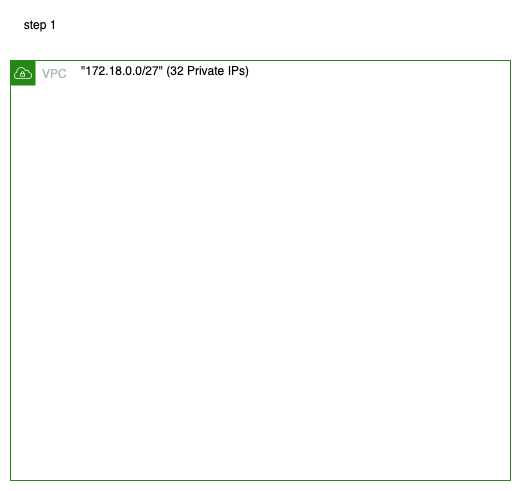
Provision the VPC
It is very easy to do with a terraform file (vpc.tf) like this:
This will create a new VPC and will allocate the private IP range:
172.18.0.0/27
Note that AWS recommends allocating private IP addresses to your VPCs. So, we are following this suggestion here.
Let's provision the VPC with the following command:
$ terraform apply
...
This will present you with a plan to create a VPC like this:
  # aws_vpc.sms will be created
  + resource "aws_vpc" "private_and_public_subnets" {
      + arn                                  = (known after apply)
      + cidr_block                           = "172.18.0.0/27"
      + default_network_acl_id               = (known after apply)
      + default_route_table_id               = (known after apply)
      + default_security_group_id            = (known after apply)
      + dhcp_options_id                      = (known after apply)
      + enable_dns_hostnames                 = true
      + enable_dns_support                   = true
      + enable_network_address_usage_metrics = (known after apply)
      + id                                   = (known after apply)
      + instance_tenancy                     = "default"
      + ipv6_association_id                  = (known after apply)
      + ipv6_cidr_block                      = (known after apply)
      + ipv6_cidr_block_network_border_group = (known after apply)
      + main_route_table_id                  = (known after apply)
      + owner_id                             = (known after apply)
      + tags                                 = {
          + "Name" = "private-public-subnets-vpc"
        }
      + tags_all                             = {
          + "Name"      = "private-public-subnets-vpc"
          + "project"   = "private-public-subnets"
          + "terraform" = "1"
        }
    }

Plan: 1 to add, 0 to change, 0 to destroy.
Confirm with yes.
Visually Inspecting VPC
After successful completion of the VPC provision by terraform, we can visually confirm that it has been created, using the AWS Management Console.
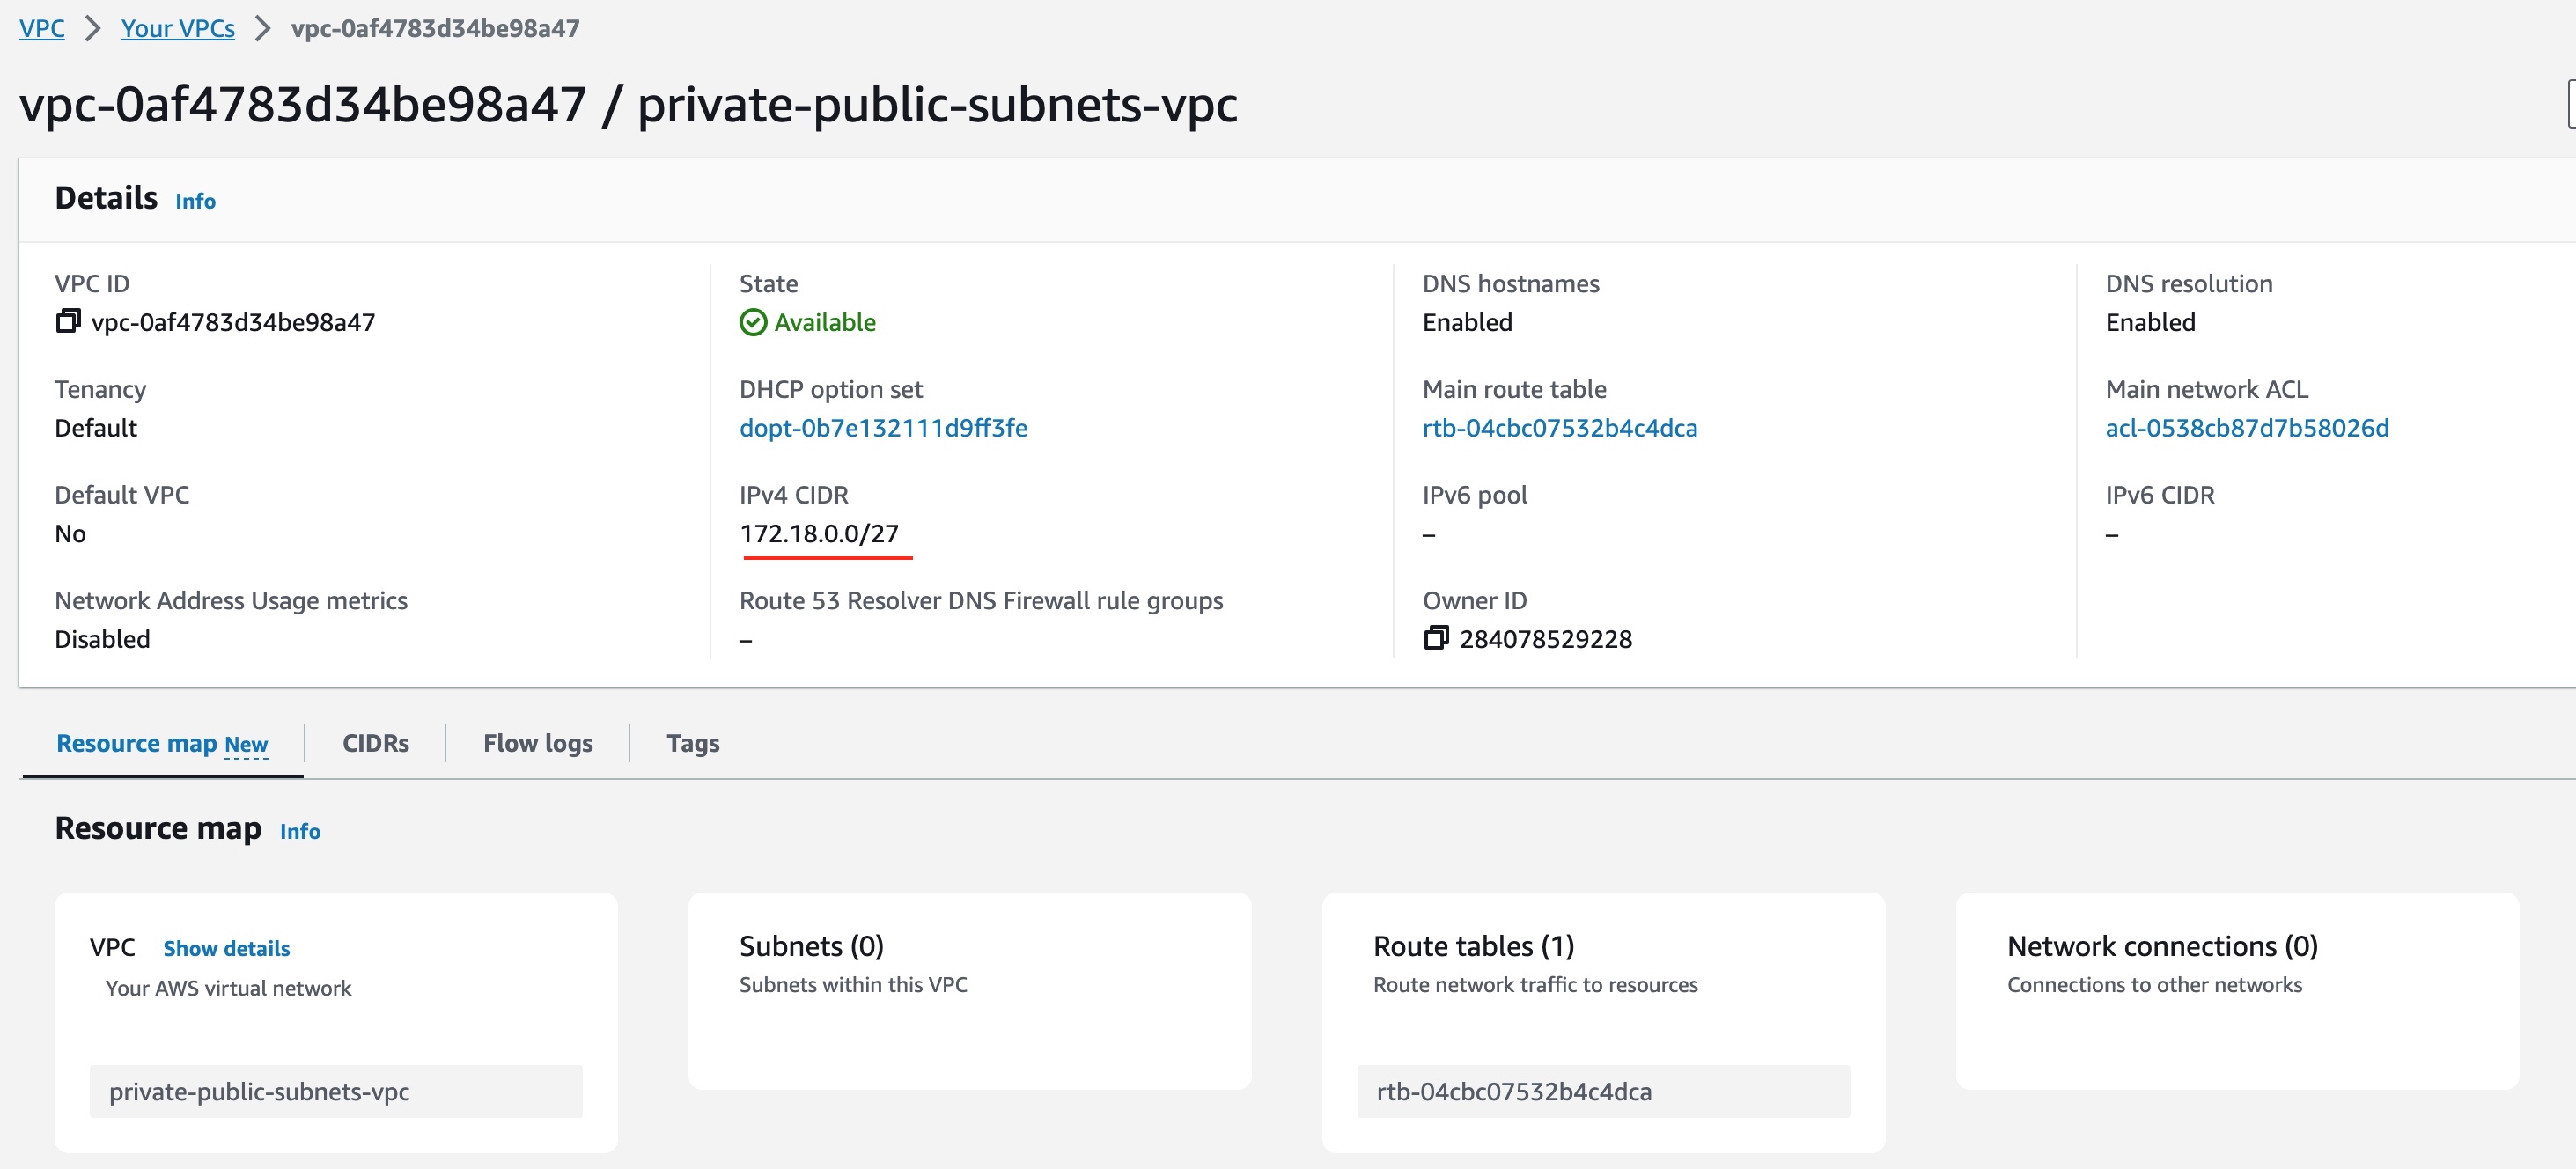
Step 1 finished!
Step 2 - Subnets
The 2nd step is to create the two subnets inside the VPC. Note that the subnets will initially be created as private. This is the default creation mode of a subnet. There is nothing here that would render the subnet public. The public trait will be introduced in a following step.
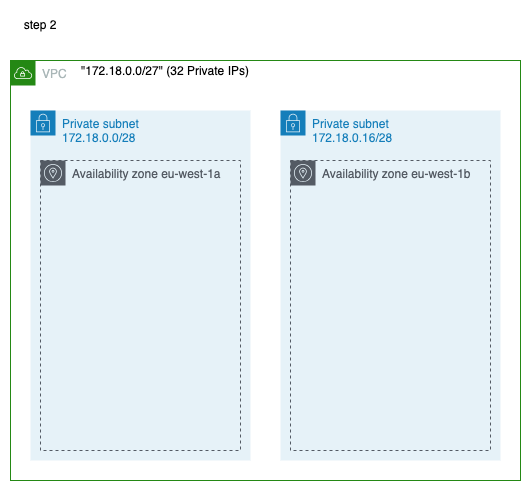
As you can see from the picture above, we intend to create the two subnets in two different availability zones. However, this is not necessary for the objective of the blog post. You could create them both in the same availability zone.
Provision the Subnets
We create the file vpc_subnets.tf with the following contents:
The total number of IP addresses in our VPC is 32. We allocate 16 IP addresses (172.18.0.0/28) to the first subnet
and the other 16 addresses (172.18.0.16/28) to the second subnet.
Note that we name the subnets so that their name indicates whether they are private or public. Here, we use private in their name for both. In a following step, when we will turn the second subnet to public, we will also change its name.
Otherwise, the rest of the content is self-explanatory.
Let's provision with terraform:
$ terraform apply
...
This will present the following plan:
  # aws_subnet.subnet_1 will be created
  + resource "aws_subnet" "subnet_1" {
      + arn                                            = (known after apply)
      + assign_ipv6_address_on_creation                = false
      + availability_zone                              = "eu-west-1a"
      + availability_zone_id                           = (known after apply)
      + cidr_block                                     = "172.18.0.0/28"
      + enable_dns64                                   = false
      + enable_resource_name_dns_a_record_on_launch    = false
      + enable_resource_name_dns_aaaa_record_on_launch = false
      + id                                             = (known after apply)
      + ipv6_cidr_block_association_id                 = (known after apply)
      + ipv6_native                                    = false
      + map_public_ip_on_launch                        = false
      + owner_id                                       = (known after apply)
      + private_dns_hostname_type_on_launch            = (known after apply)
      + tags                                           = {
          + "Name" = "private-subnet-1"
        }
      + tags_all                                       = {
          + "Name"      = "private-subnet-1"
          + "project"   = "private-public-subnets"
          + "terraform" = "1"
        }
      + vpc_id                                         = "vpc-0af4783d34be98a47"
    }

  # aws_subnet.subnet_2 will be created
  + resource "aws_subnet" "subnet_2" {
      + arn                                            = (known after apply)
      + assign_ipv6_address_on_creation                = false
      + availability_zone                              = "eu-west-1b"
      + availability_zone_id                           = (known after apply)
      + cidr_block                                     = "172.18.0.16/28"
      + enable_dns64                                   = false
      + enable_resource_name_dns_a_record_on_launch    = false
      + enable_resource_name_dns_aaaa_record_on_launch = false
      + id                                             = (known after apply)
      + ipv6_cidr_block_association_id                 = (known after apply)
      + ipv6_native                                    = false
      + map_public_ip_on_launch                        = false
      + owner_id                                       = (known after apply)
      + private_dns_hostname_type_on_launch            = (known after apply)
      + tags                                           = {
          + "Name" = "private-subnet-2"
        }
      + tags_all                                       = {
          + "Name"      = "private-subnet-2"
          + "project"   = "private-public-subnets"
          + "terraform" = "1"
        }
      + vpc_id                                         = "vpc-0af4783d34be98a47"
    }

Plan: 2 to add, 0 to change, 0 to destroy.
We confirm with yes and terraform creates the two subnets.
Visually Inspecting Subnets
We then visit the AWS Management Console to confirm that the two subnets have been created successfully.

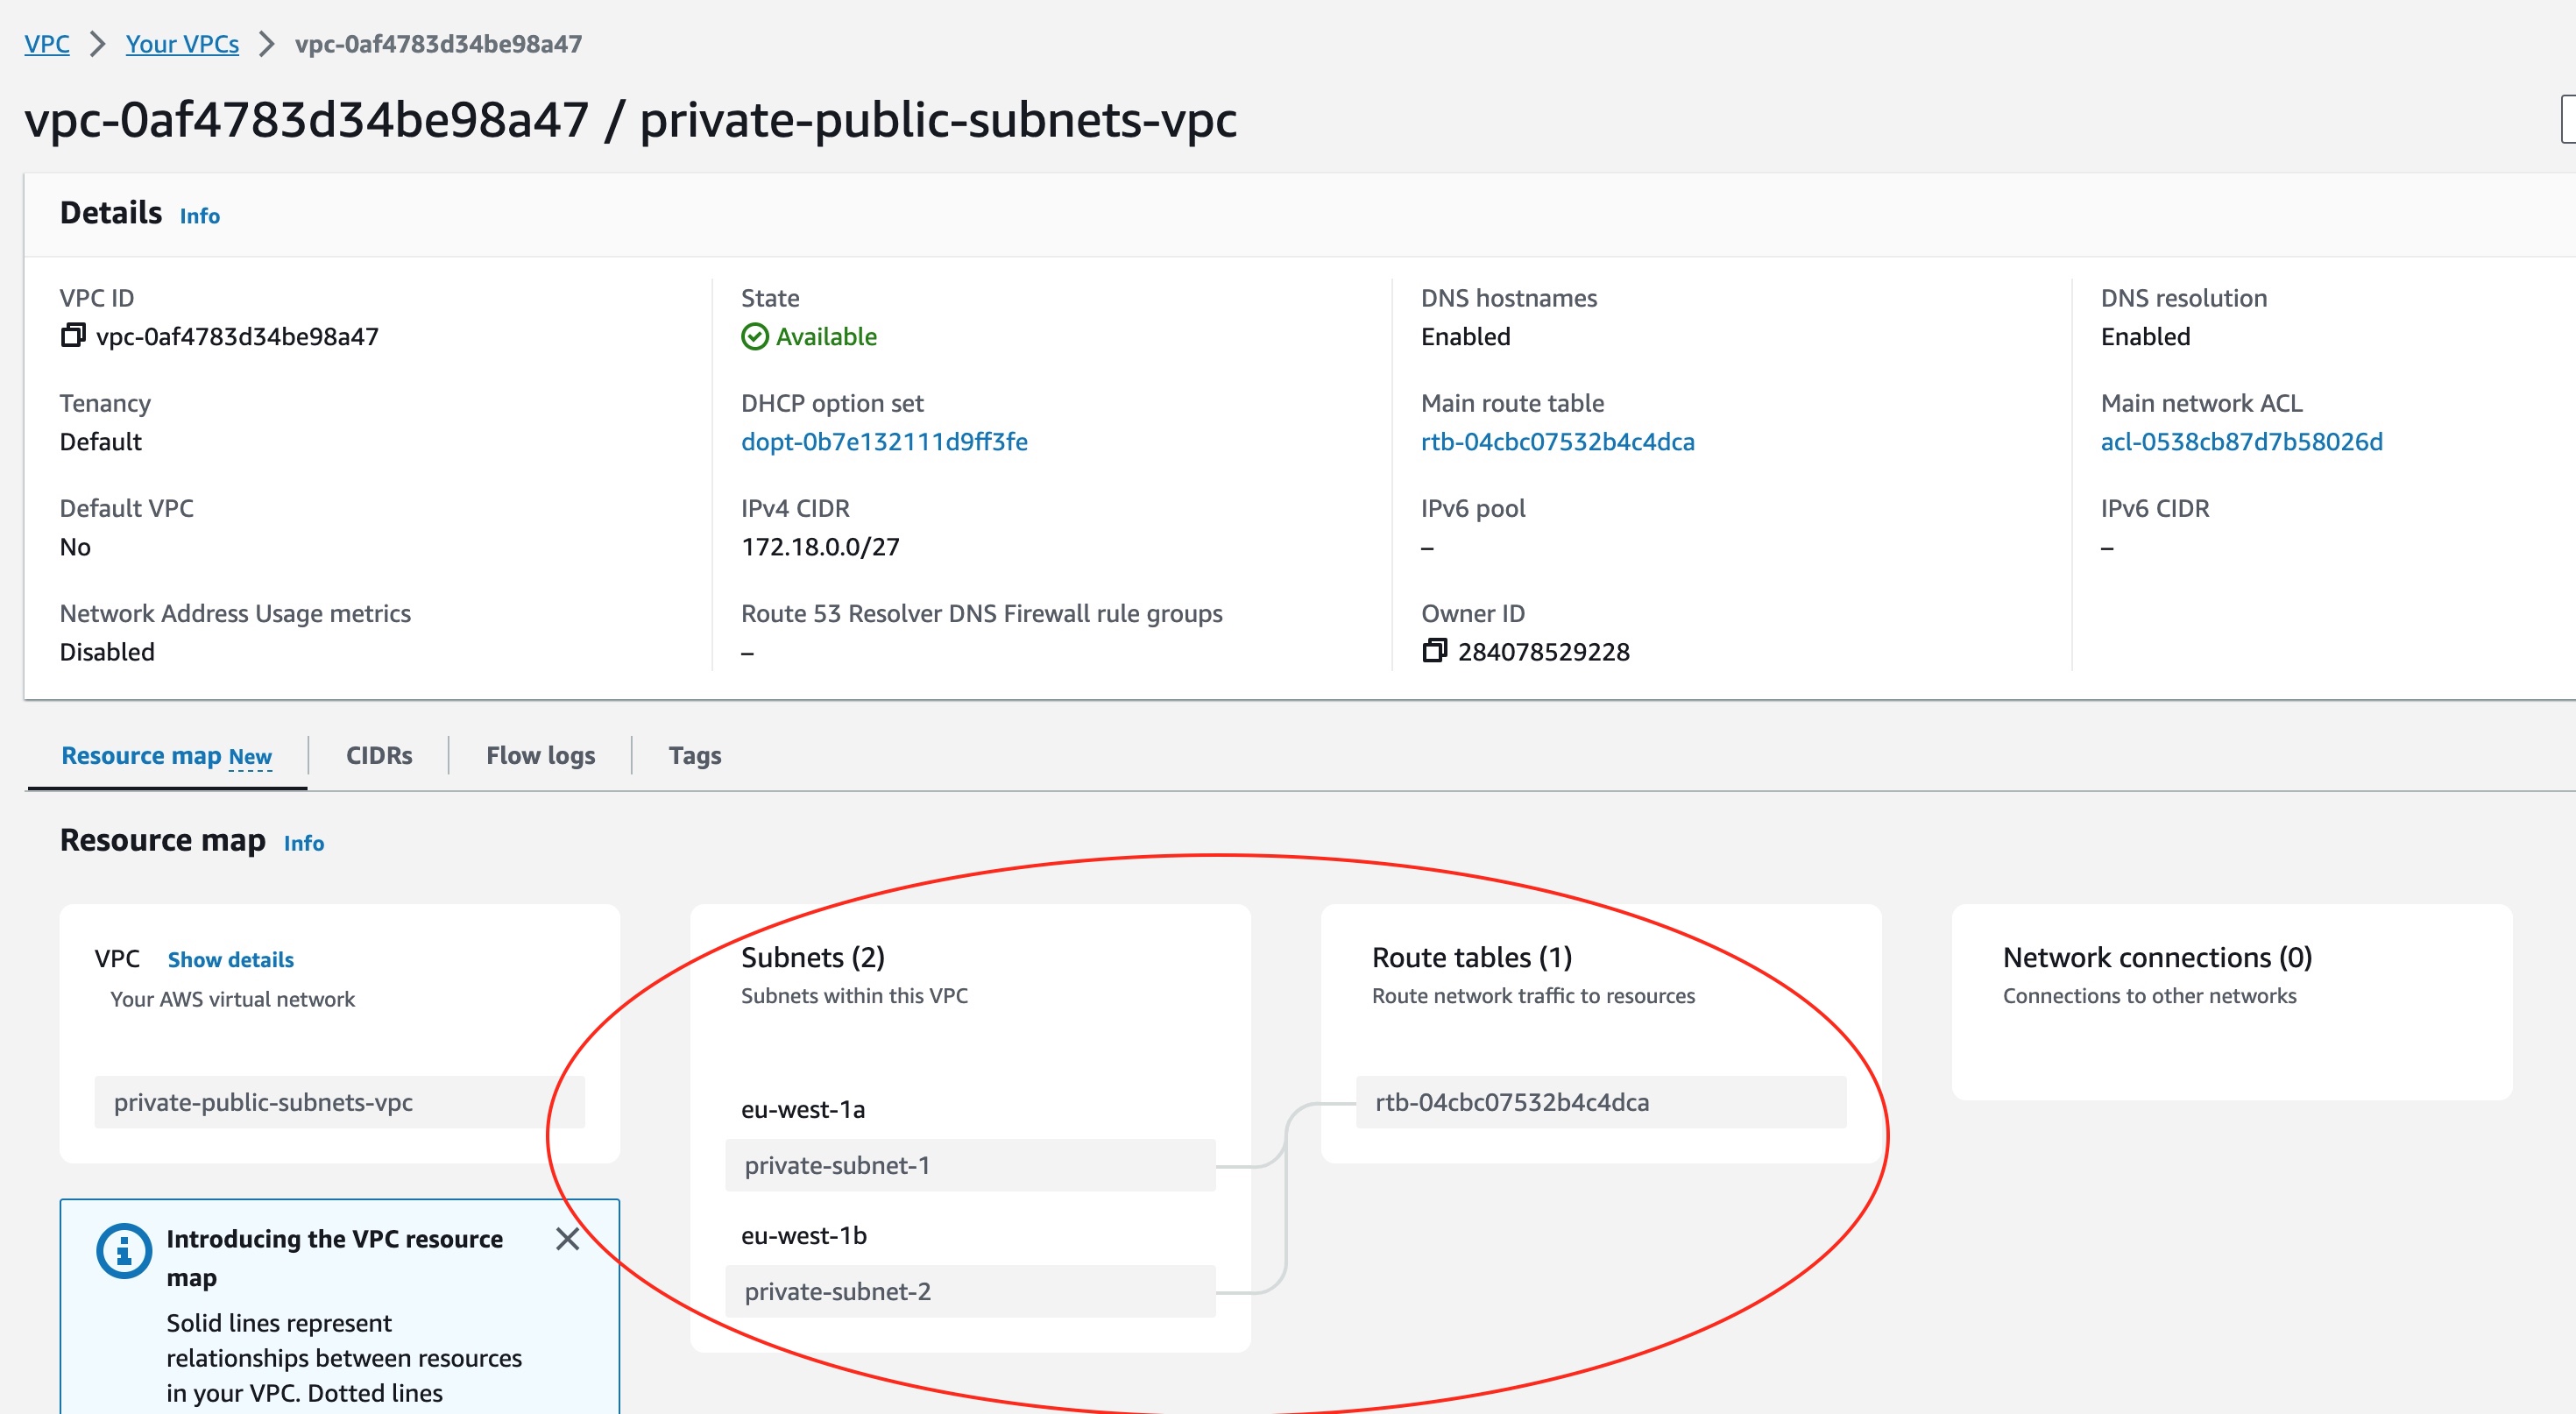
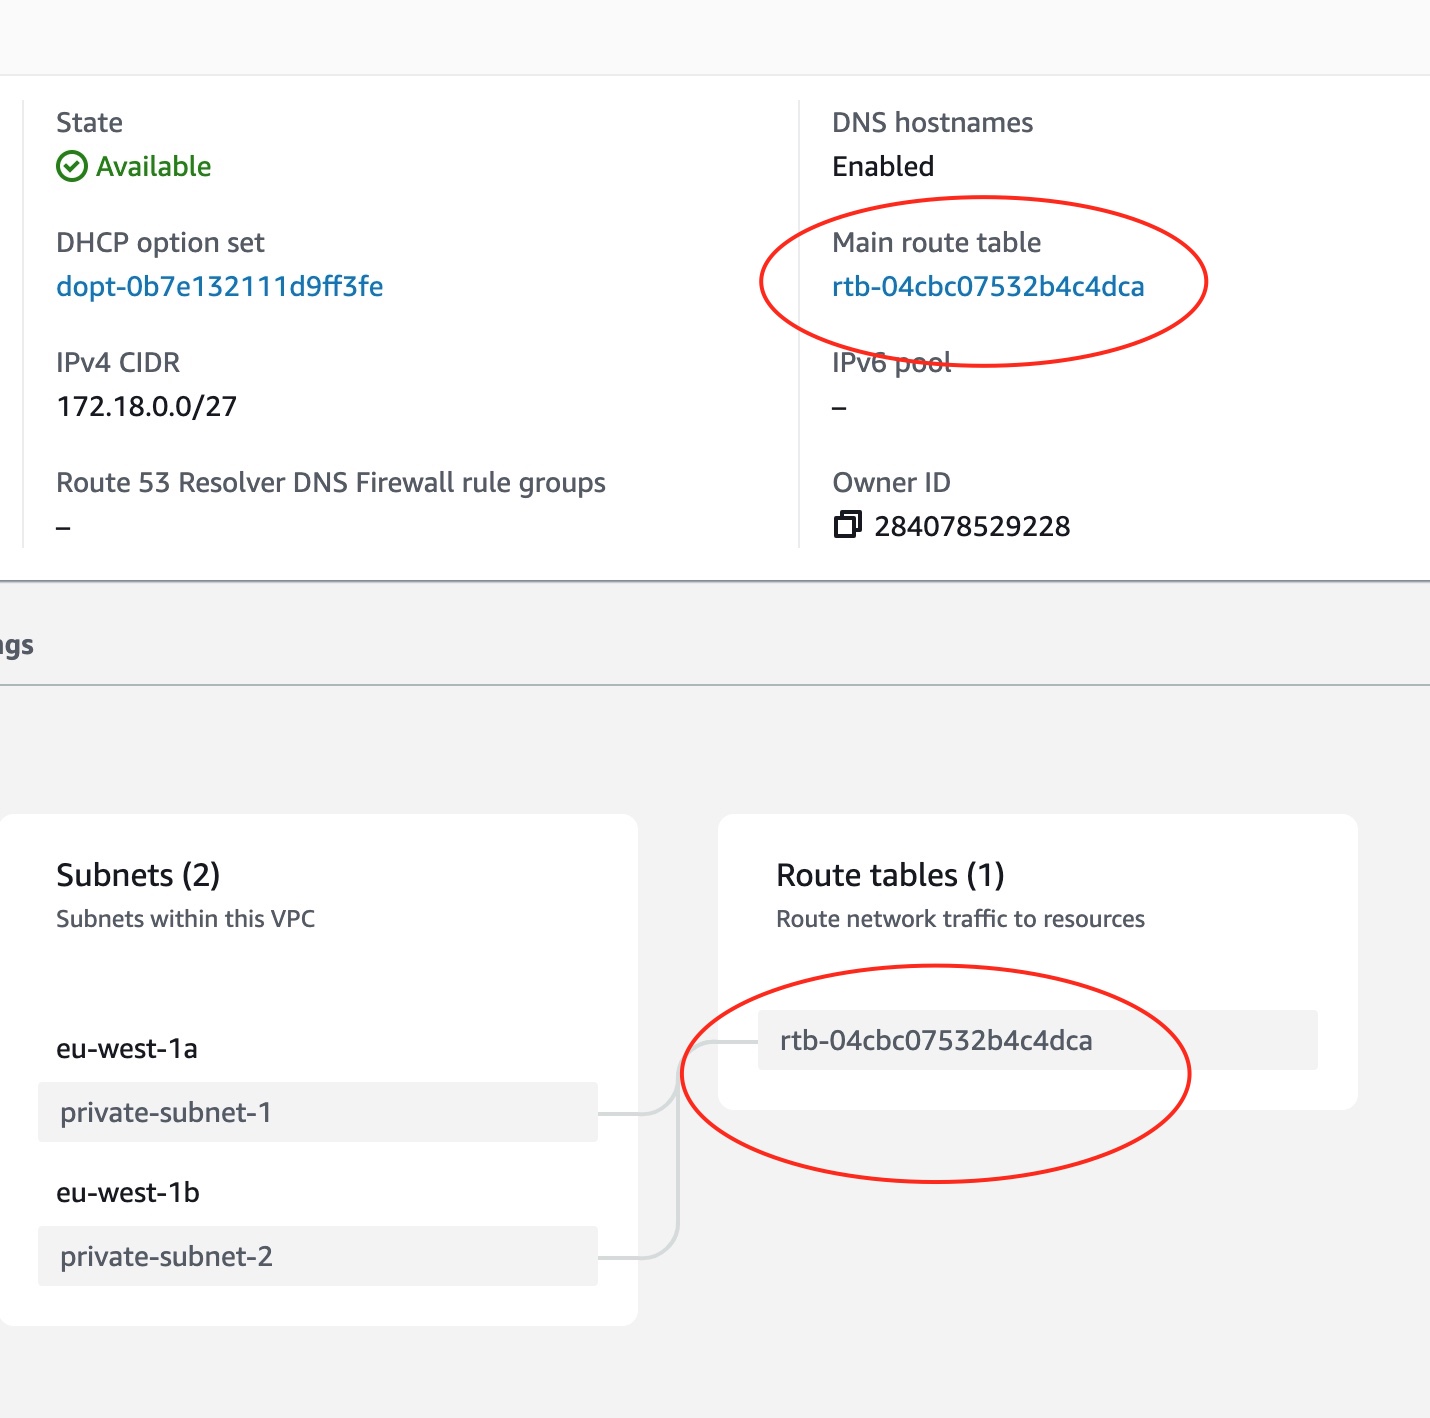
Also, if we visit the VPC details page, we will see the two subnets associated with the main route table of the VPC.
When AWS creates a VPC for us, it automatically creates a route table that is called main route table.
Visit the Main Route Table
We can visit the main route table and see how it is associated with the two subnets.
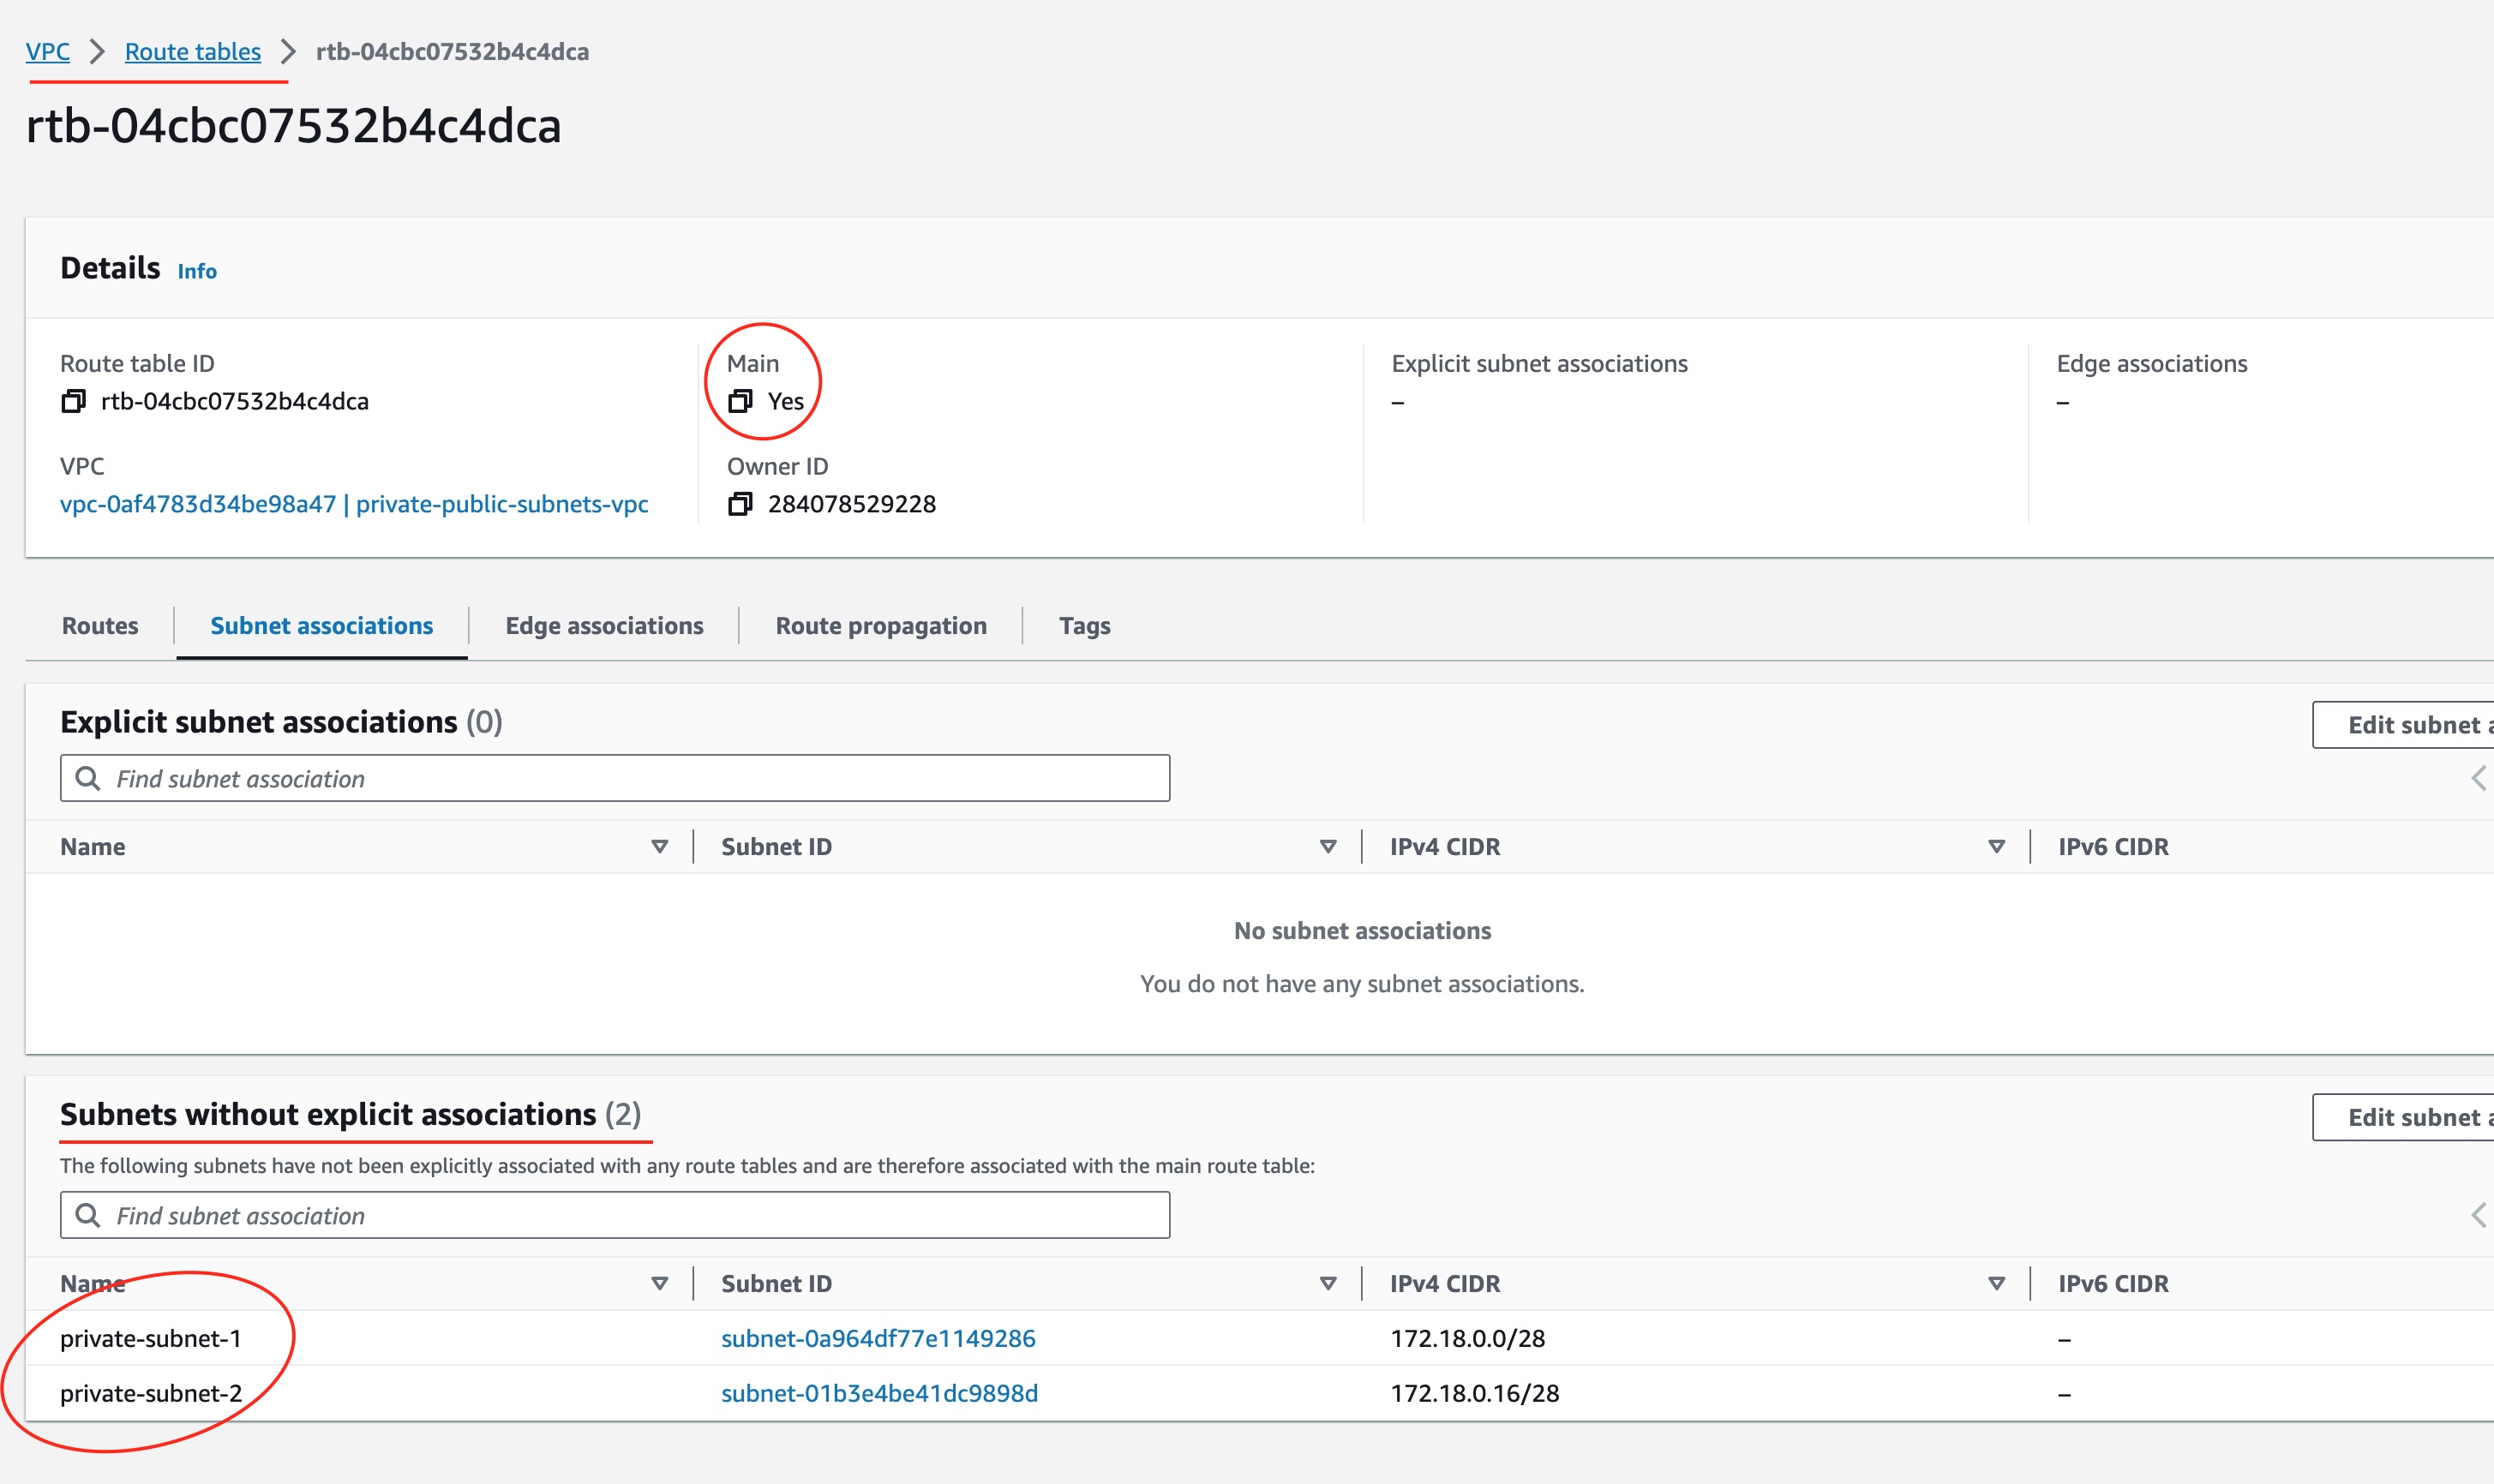
As you can see, the association of the subnets to the main route table is implicit. This means that the two subnets will be using the main route able if they are not explicitly associated to another route table.
This is very important detail that you need to keep in mind. Because, in a subsequent step, we will create a special route table that will be explicitly associated to the 2nd subnet in order to make it public. Also, we will create one more route able to explicitly associate it to the 1st subnet in order to allow it to access public Internet. But, hold on until then.
Main Route Table Allowed Traffic
But how does the main route table define the routes that are allowed for its associated (explicitly or implicitly associated) subnets?
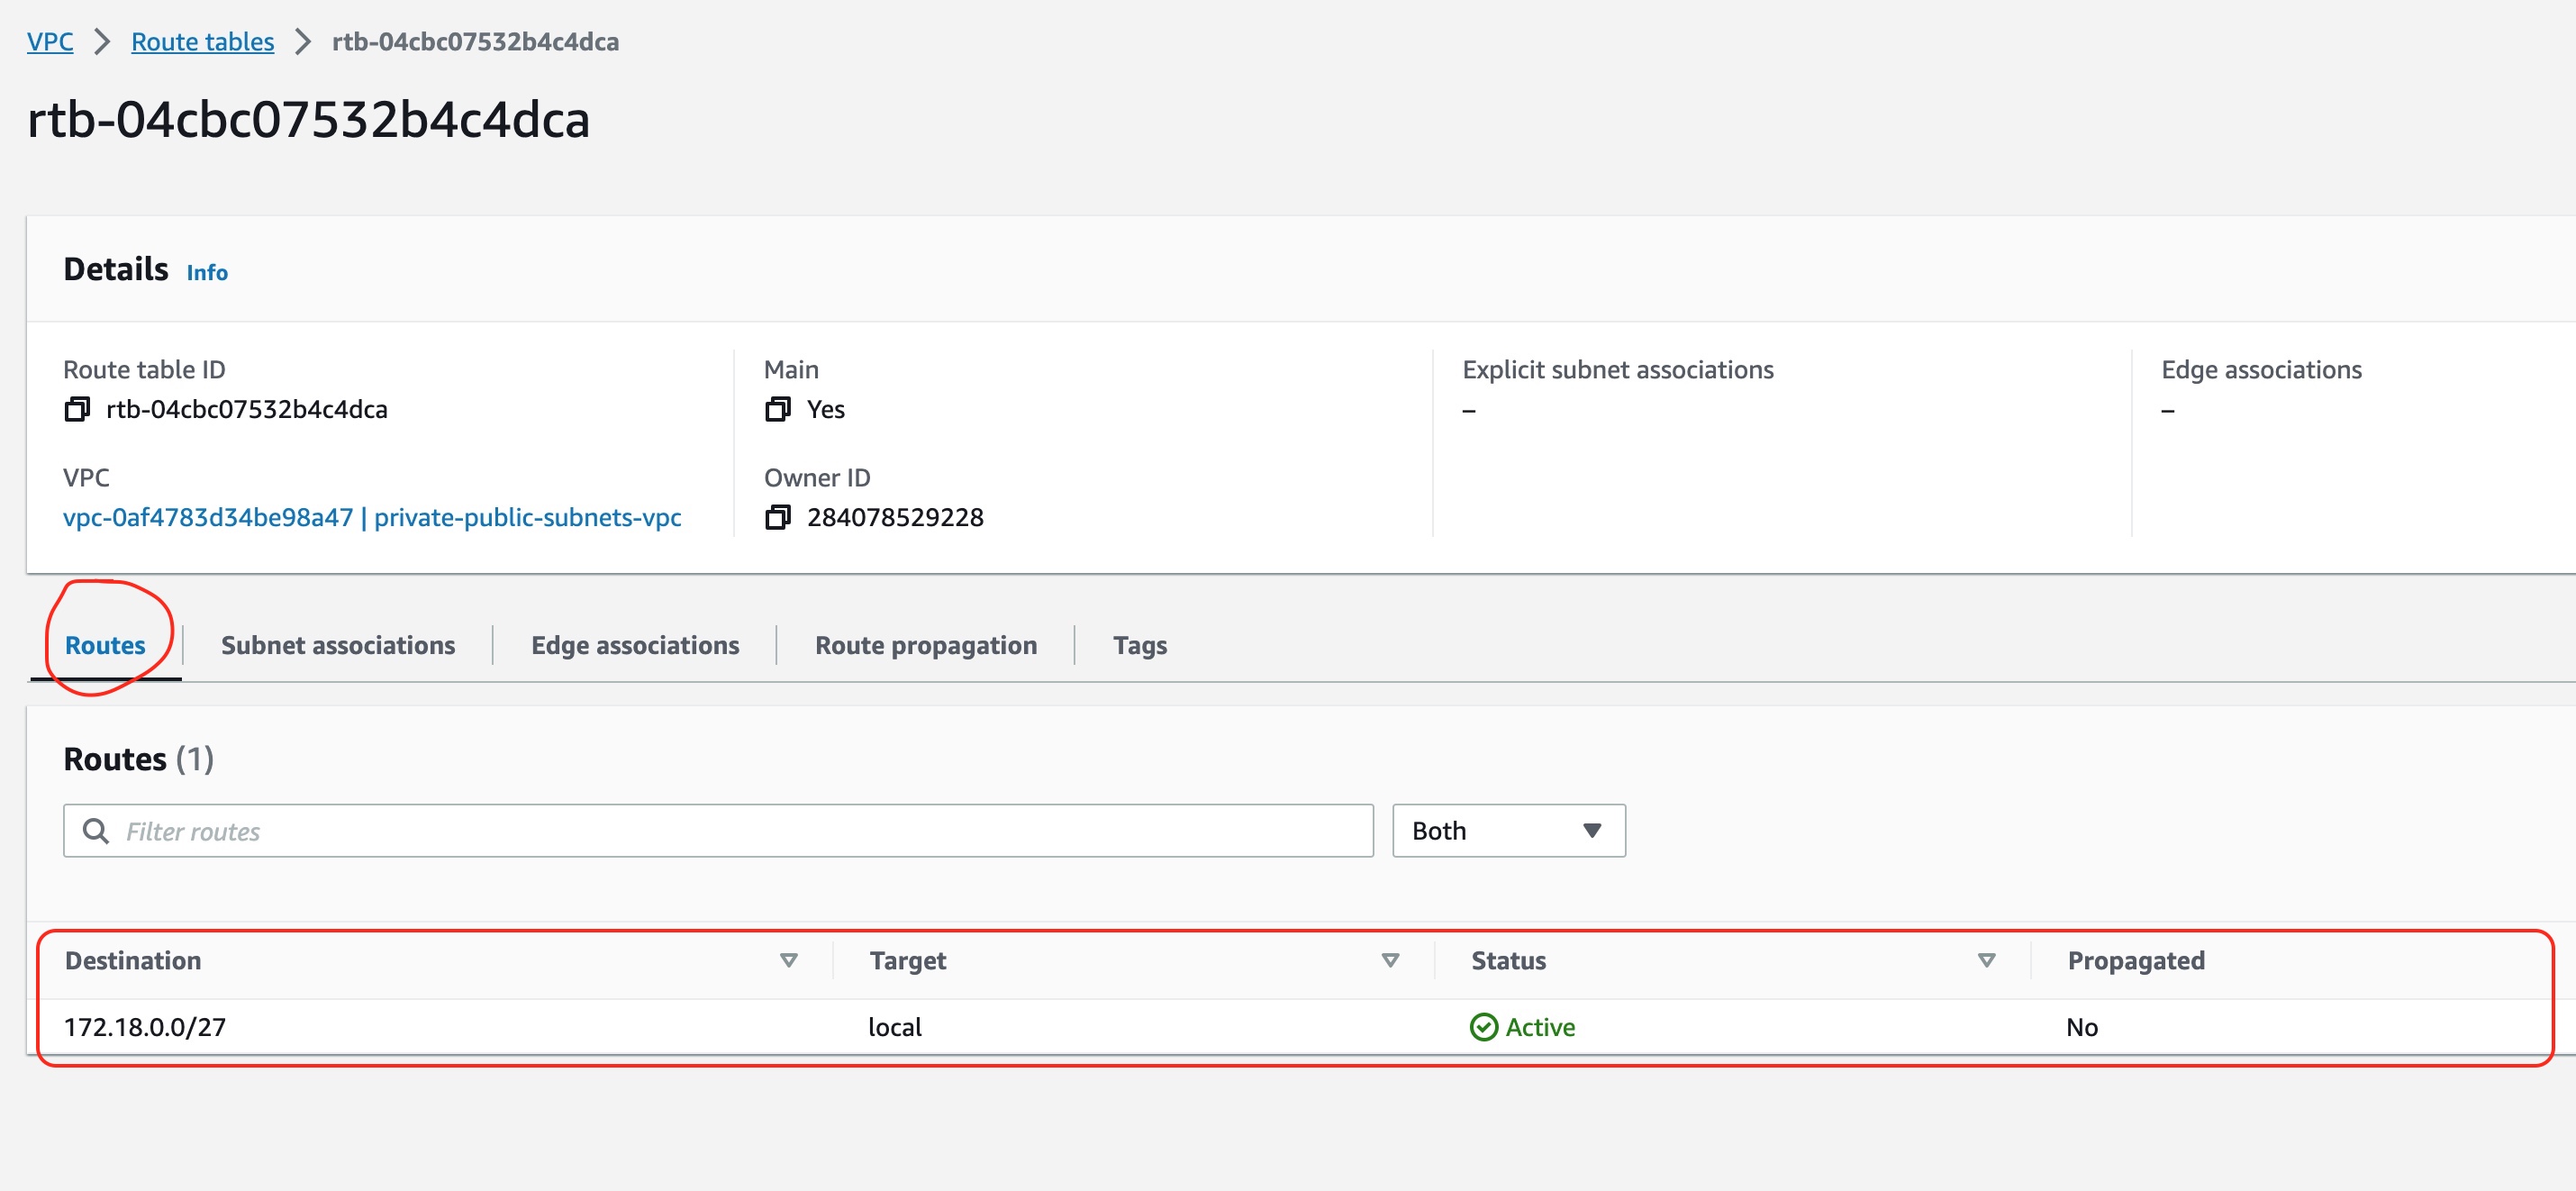
It defines them with the routes. And as you can see, there is only one entry in the routes list.
This entry routes packets that are destined to all the IPs of the VCP to a target called local. This,
basically, means that the main route table can route IP packets within VPC only. Any IP packet that
could potentially have to go to another IP address it will fail, because there is no route to handle it.
Default Security Group
But there is one more factor that determines how traffic can travel from one host to another. It is called Security Group.
When one creates a VPC, a default security group is also created automatically.
You can visit the security groups in the EC2 AWS Management Console. Locate the default security group for the VPC that you have created.
You will see that it has inbound and outbound rules:
Default Security Group - Inbound Rules
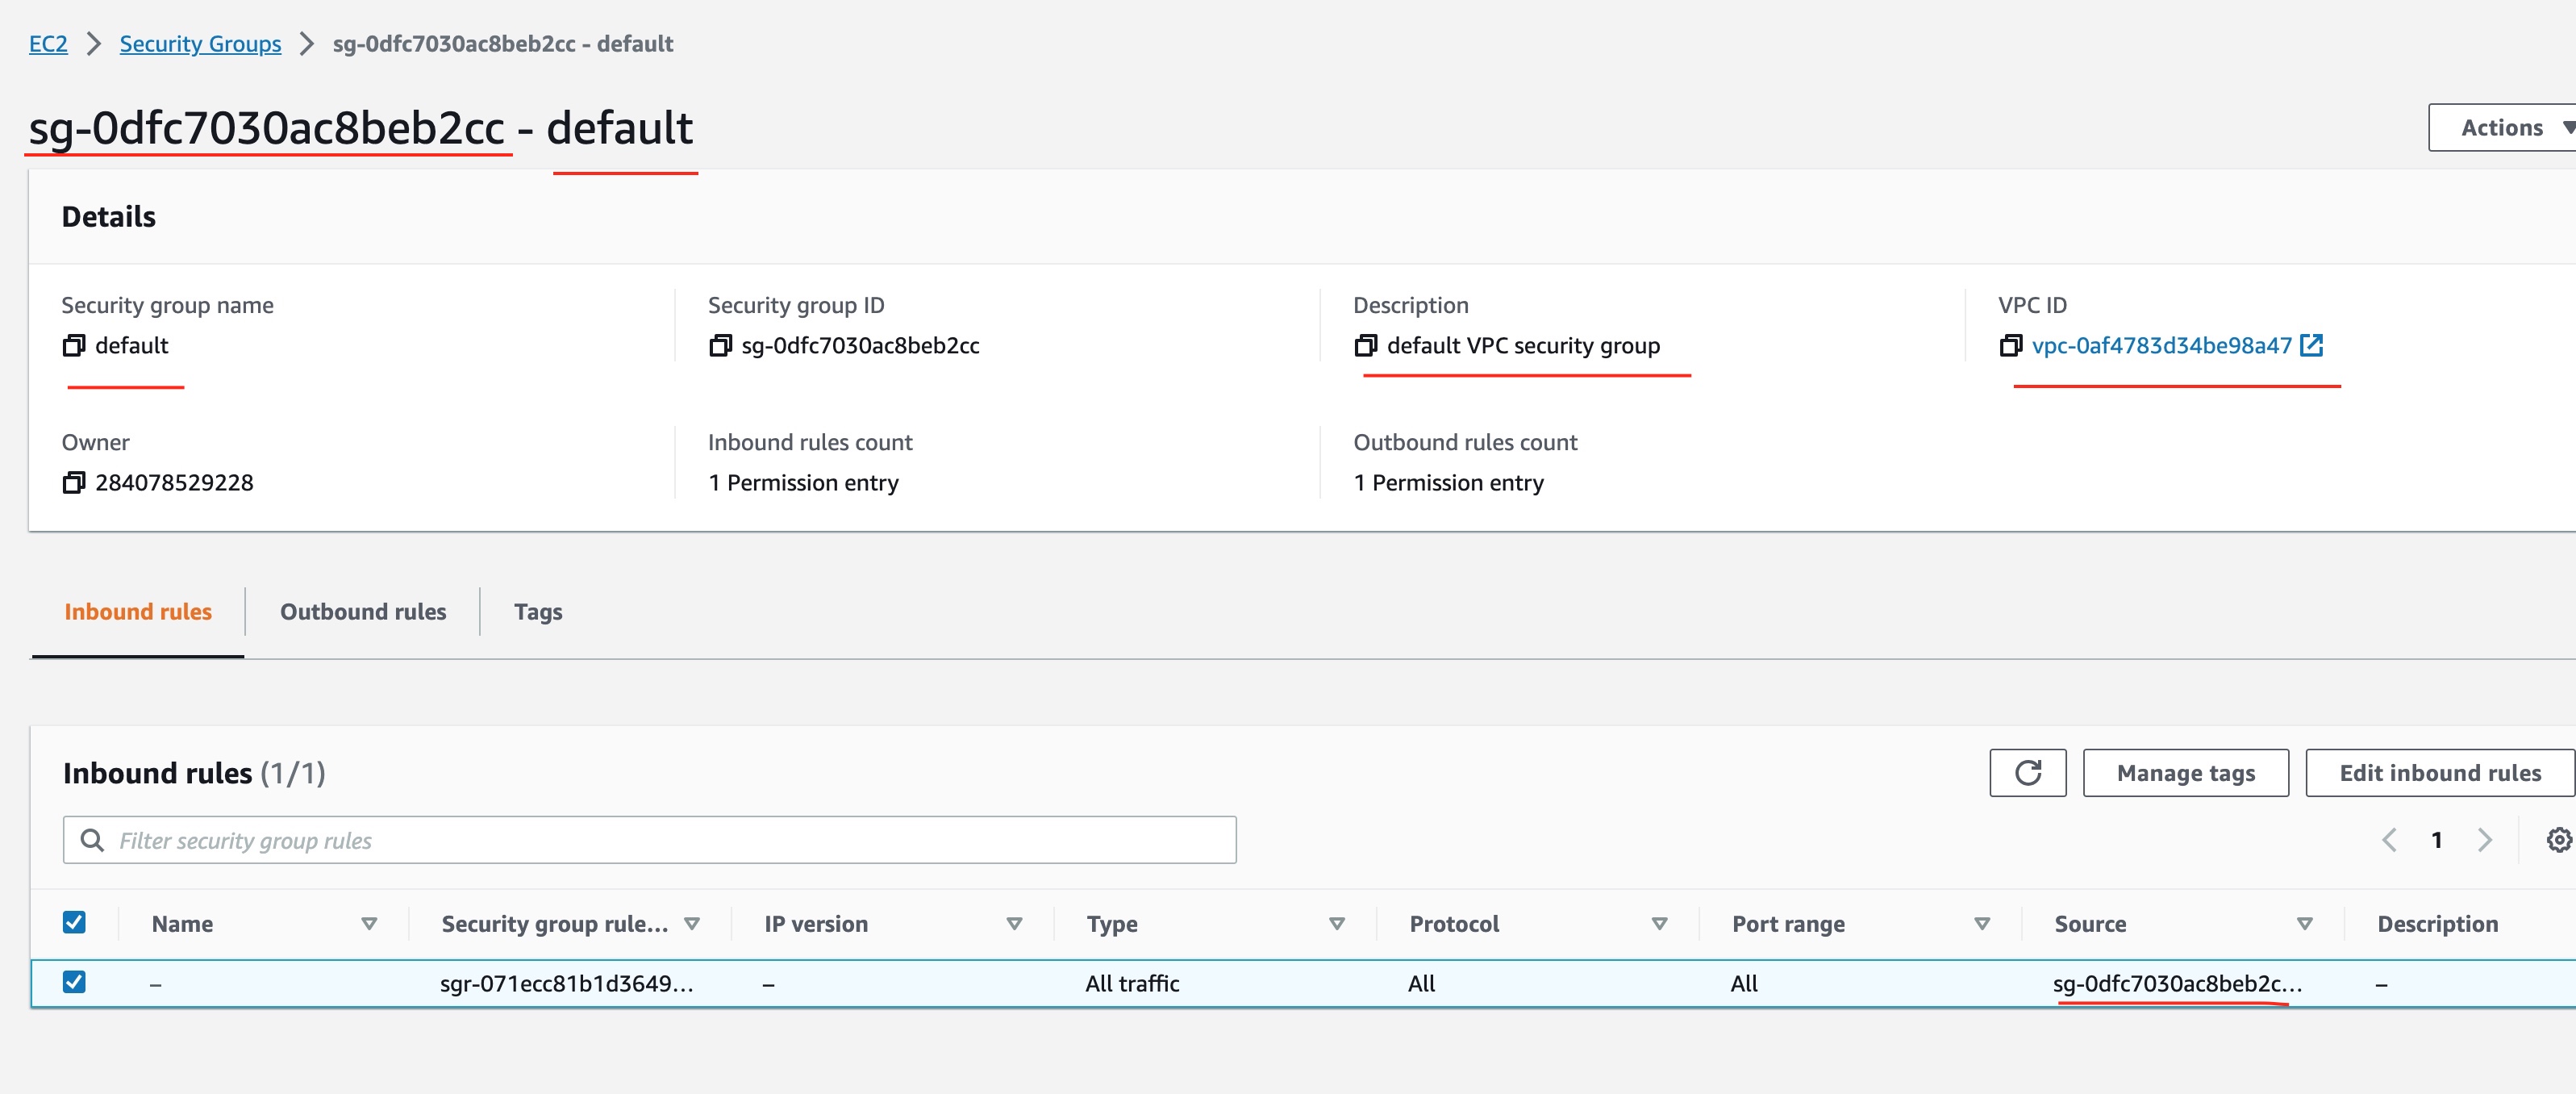
The default security group allows any inbound traffic as long as it comes (see Source column) from another machine in the same security group.
Default Security Group - Outbound Rules
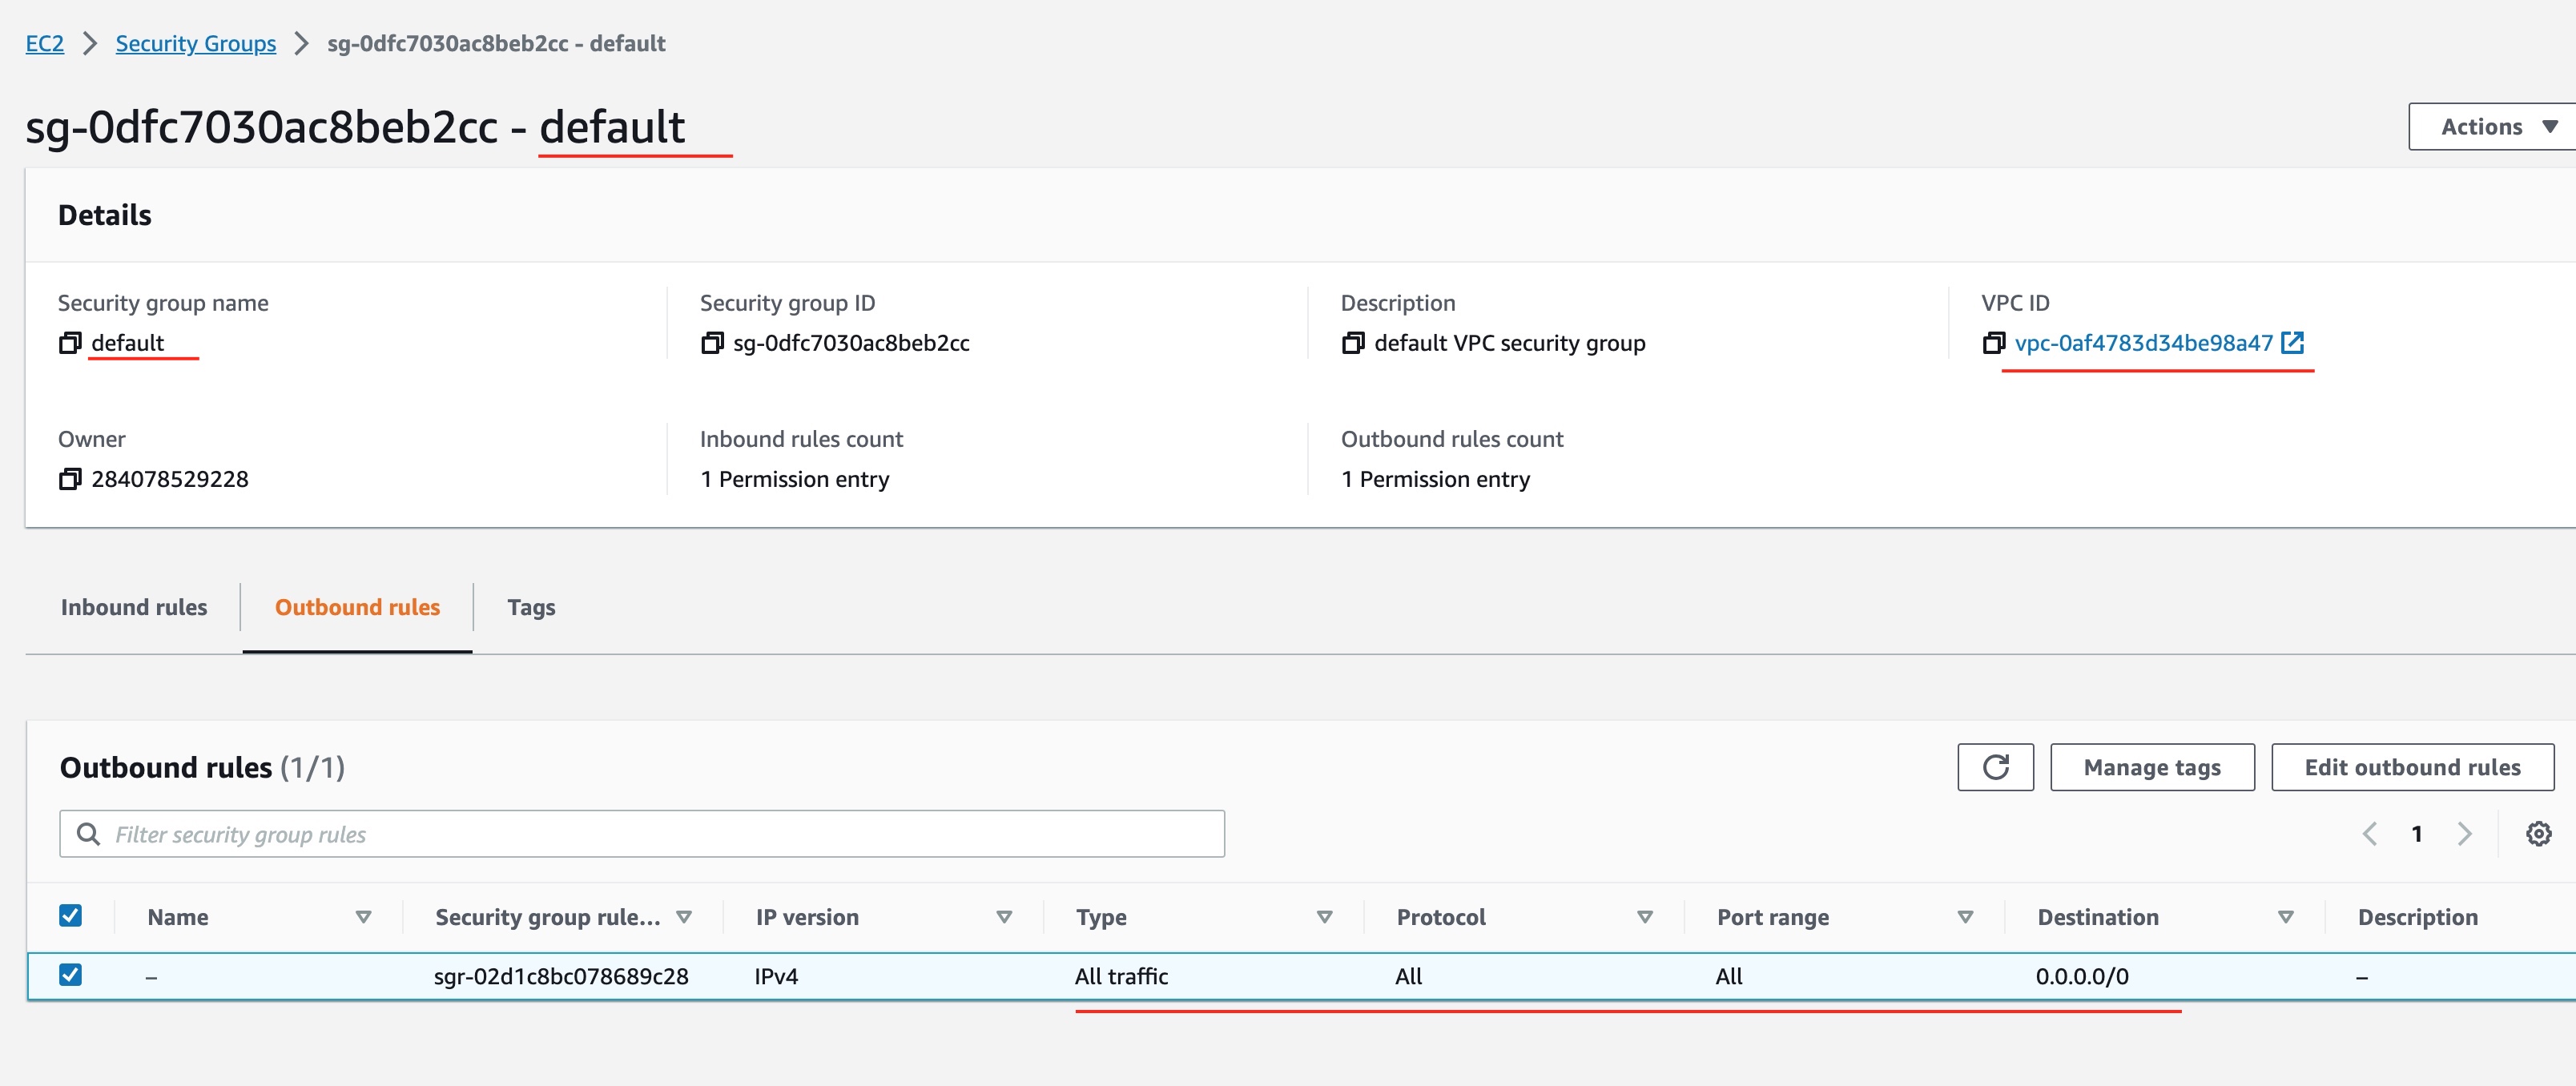
The default security group allows all outbound traffic to any destination (see column Destination). The specification 0.0.0.0/0 means any destination.
In other words, the default security group allows outbound traffic to any destination, but inbound traffic only as long as it is coming from a local machine, i.e. from within the VPC.
This finishes Step 2. Let's summarize the things we need to remember:
- We created 2 subnets. They are still private.
- There is a default main route table which is implicitly associated to the two subnets and knows how to route local/VPC traffic only.
- There is a default security group that allows any outbound traffic but only local inbound traffic.
Let's move on to step 3.
Step 3 - First Key Pair
Before we can create EC2 machines inside the subnets, we will need to have in place a way to connect to them. The EC2 machines that we will create do not provide classic credentials (username/password) login to them. The only way one can connect is via SSH public/private key pair.
We need to create a key pair and then upload its public part onto our AWS account. Then, we will associate the key pair with the EC2 machine(s) when provisioning them.
Create the First Key Pair
Note: We are now creating the first key pair. This will be used to connect to an EC2 machine from our local laptop. Later, we will create another key pair. It will be used to connect from one EC2 machine to another.
There are many different ways you can generate a key pair. We use the tool ssh-keygen. We invoke it
like this:
$ ssh-keygen -m PEM
Important. Make sure that the format is PEM and that you don't protect the key with a passphrase.
Also, when prompted for the name of the file give ./id_rsa. This will create two files inside your working folder. The id_rsa which is the private part, and the id_rsa.pub which is the public one.
Provision the First Key Pair
With the two files id_rsa and id_rsa.pub in place, let's create the correct terraform configuration file that would upload the key to our AWS account:
The file terraform function is used to load the contents of a local file into an attribute. The resource aws_key_pair knows how to upload the key to our AWS Account.
Let's apply the terraform plan:
$ terraform apply
...
This will apply the following plan:
  # aws_key_pair.private_public_subnets will be created
  + resource "aws_key_pair" "private_public_subnets" {
      + arn             = (known after apply)
      + fingerprint     = (known after apply)
      + id              = (known after apply)
      + key_name        = "private-public-subnets"
      + key_name_prefix = (known after apply)
      + key_pair_id     = (known after apply)
      + key_type        = (known after apply)
      + public_key      = "ssh-rsa AAAAB3NzaC1yc2EAAAADAQABAAABgQCsFhZwdYhzdIgqVk8g3mVdP/PuMVDymbqYAdD8+i1Y+I8K0wYlyDGL0jO+t0sRbIktFZiAOoMZiL1Lb55UsxdPpCFd/BBMHZf2oiaXqUuVGC6QM6YkYgAV3/nipvUsI/UoAVoVKE9rskUgn13Teg+VQkjFm+fwtahQyd5Y67UNmYFzWntFR9h2aWHCeTnJ9Cir3M4O8t1Hag8SmLbTJe3UR9rnmjfpc+a66H4FENhukjXlfsFfOxwLw4vGciG6TPgMCEcUhxG5pUX74zlP/331RUetoWWT18RpeKXLJfQQHca5uW3JW9/F/1+cnRvqfvSQsHSUyaENVg7rb3dDtlNdVqjJywqNdJeWmryqmRPz0NZ606Tp9sQWlPLmP2Qy0vup5t+8S9eGnaqINXEZQ43LrErHiGafzmBfMBJV+dae3MFJwwQ+p6zabogjdwdvTxdsm6ifeF1cmq/x5aw5VjXDxZ2K88JHgFmi5bHx1X9wLQ8ztXADeBv3zsHMaD3wIJE= panayotismatsinopoulos@macbookpro.matsinopoulos.gr"
      + tags            = {
          + "Name" = "private-public-subnets"
        }
      + tags_all        = {
          + "Name"      = "private-public-subnets"
          + "project"   = "private-public-subnets"
          + "terraform" = "1"
        }
    }

Plan: 1 to add, 0 to change, 0 to destroy.
which creates the AWS Key Pair in our AWS Account.
Visually Inspect the AWS Key Pair
We can visit the EC2 AWS Management Console and then the Key Pairs list. We should see the key pair created:

That finishes step 3!
Step 4 - Create two EC2 Machines
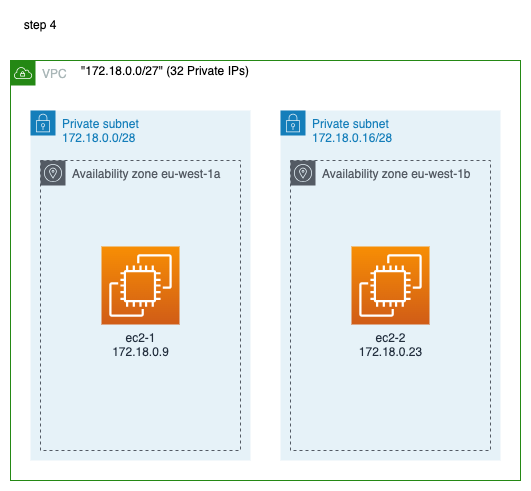
In this step we will create two EC2 machines. One in the first subnet and the other one in the second subnet.
Provision the EC2 Machines
We create the file
The first part, data "aws_ami" "client" {...} is a way to tell terraform how to select an AMI from the list of available AMIs. It is as if we browse the list using a Web form and we use filters to limit the results we are presented with so that we can select the one we want.
Next, we use the AMI selected as a value for the attribute ami in the aws_instance resources.
Note that both EC2 instances are provisioned in a similar manner. The only difference, for now, is their availability zone and subnet. First machine is deployed in the first subnet and the second machine in the second subnet.
Note also that both machines will be assigned a private IP address only. This is because of the value of the attribute associate_public_ip_address which has the value false. In a later step, we will turn the second subnet to public and then we will change the value of the associate_public_ip_address of the second machine to be true.
We call
$ terraform apply
...
This will suggest the following plan:
  # aws_instance.ec2_1 will be created
  + resource "aws_instance" "ec2_1" {
      + ami                                  = "ami-07be51e3c6d5f61d2"
      + arn                                  = (known after apply)
      + associate_public_ip_address          = false
      + availability_zone                    = "eu-west-1a"
      + cpu_core_count                       = (known after apply)
      + cpu_threads_per_core                 = (known after apply)
      + disable_api_stop                     = (known after apply)
      + disable_api_termination              = (known after apply)
      + ebs_optimized                        = (known after apply)
      + get_password_data                    = false
      + host_id                              = (known after apply)
      + host_resource_group_arn              = (known after apply)
      + iam_instance_profile                 = (known after apply)
      + id                                   = (known after apply)
      + instance_initiated_shutdown_behavior = (known after apply)
      + instance_lifecycle                   = (known after apply)
      + instance_state                       = (known after apply)
      + instance_type                        = "t2.micro"
      + ipv6_address_count                   = (known after apply)
      + ipv6_addresses                       = (known after apply)
      + key_name                             = "private-public-subnets"
      + monitoring                           = (known after apply)
      + outpost_arn                          = (known after apply)
      + password_data                        = (known after apply)
      + placement_group                      = (known after apply)
      + placement_partition_number           = (known after apply)
      + primary_network_interface_id         = (known after apply)
      + private_dns                          = (known after apply)
      + private_ip                           = (known after apply)
      + public_dns                           = (known after apply)
      + public_ip                            = (known after apply)
      + secondary_private_ips                = (known after apply)
      + security_groups                      = (known after apply)
      + source_dest_check                    = true
      + spot_instance_request_id             = (known after apply)
      + subnet_id                            = "subnet-0a964df77e1149286"
      + tags                                 = {
          + "Name" = "ec2-1"
        }
      + tags_all                             = {
          + "Name"      = "ec2-1"
          + "project"   = "private-public-subnets"
          + "terraform" = "1"
        }
      + tenancy                              = (known after apply)
      + user_data                            = (known after apply)
      + user_data_base64                     = (known after apply)
      + user_data_replace_on_change          = false
      + vpc_security_group_ids               = (known after apply)
    }

  # aws_instance.ec2_2 will be created
  + resource "aws_instance" "ec2_2" {
      + ami                                  = "ami-07be51e3c6d5f61d2"
      + arn                                  = (known after apply)
      + associate_public_ip_address          = false
      + availability_zone                    = "eu-west-1b"
      + cpu_core_count                       = (known after apply)
      + cpu_threads_per_core                 = (known after apply)
      + disable_api_stop                     = (known after apply)
      + disable_api_termination              = (known after apply)
      + ebs_optimized                        = (known after apply)
      + get_password_data                    = false
      + host_id                              = (known after apply)
      + host_resource_group_arn              = (known after apply)
      + iam_instance_profile                 = (known after apply)
      + id                                   = (known after apply)
      + instance_initiated_shutdown_behavior = (known after apply)
      + instance_lifecycle                   = (known after apply)
      + instance_state                       = (known after apply)
      + instance_type                        = "t2.micro"
      + ipv6_address_count                   = (known after apply)
      + ipv6_addresses                       = (known after apply)
      + key_name                             = "private-public-subnets"
      + monitoring                           = (known after apply)
      + outpost_arn                          = (known after apply)
      + password_data                        = (known after apply)
      + placement_group                      = (known after apply)
      + placement_partition_number           = (known after apply)
      + primary_network_interface_id         = (known after apply)
      + private_dns                          = (known after apply)
      + private_ip                           = (known after apply)
      + public_dns                           = (known after apply)
      + public_ip                            = (known after apply)
      + secondary_private_ips                = (known after apply)
      + security_groups                      = (known after apply)
      + source_dest_check                    = true
      + spot_instance_request_id             = (known after apply)
      + subnet_id                            = "subnet-01b3e4be41dc9898d"
      + tags                                 = {
          + "Name" = "ec2-2"
        }
      + tags_all                             = {
          + "Name"      = "ec2-2"
          + "project"   = "private-public-subnets"
          + "terraform" = "1"
        }
      + tenancy                              = (known after apply)
      + user_data                            = (known after apply)
      + user_data_base64                     = (known after apply)
      + user_data_replace_on_change          = false
      + vpc_security_group_ids               = (known after apply)
    }

Plan: 2 to add, 0 to change, 0 to destroy.
which is about creating the two EC2 instances.
We confirm with yes.
Visually Confirm EC2 Instances Creation
After successful completion of the ec2 instances provisioning, we can visually inspect these instances using the EC2 Management Console.

Both of these instances have private IP addresses and they don't have public IP addresses.


As you can understand, there is no way for these machines to accept any traffic from public Internet, since they don't have a public IP address.
This finishes step number 4!
Step 5 - Allow EC2 Second Machine to Have Public IP Address
This is going to be a very simple step. We will allow the second EC2 machine, the ec2-2 to have a public IP address.
Provision public IP Address for ec2-2
We change the file ec2.tf, line 61, so that the attribute associate_public_ip_address to have the value true:
...
resource "aws_instance" "ec2_2" {
...
  associate_public_ip_address = true
...
}
Then we apply the change:
$ terraform apply
...
This will present us with the following plan:
-/+ resource "aws_instance" "ec2_2" {
      ~ arn                                  = "arn:aws:ec2:eu-west-1:284078529228:instance/i-0b2ec445176034e32" -> (known after apply)
      ~ associate_public_ip_address          = false -> true # forces replacement
      ~ cpu_core_count                       = 1 -> (known after apply)
      ~ cpu_threads_per_core                 = 1 -> (known after apply)
      ~ disable_api_stop                     = false -> (known after apply)
      ~ disable_api_termination              = false -> (known after apply)
      ~ ebs_optimized                        = false -> (known after apply)
      - hibernation                          = false -> null
      + host_id                              = (known after apply)
      + host_resource_group_arn              = (known after apply)
      + iam_instance_profile                 = (known after apply)
      ~ id                                   = "i-0b2ec445176034e32" -> (known after apply)
      ~ instance_initiated_shutdown_behavior = "stop" -> (known after apply)
      + instance_lifecycle                   = (known after apply)
      ~ instance_state                       = "running" -> (known after apply)
      ~ ipv6_address_count                   = 0 -> (known after apply)
      ~ ipv6_addresses                       = [] -> (known after apply)
      ~ monitoring                           = false -> (known after apply)
      + outpost_arn                          = (known after apply)
      + password_data                        = (known after apply)
      + placement_group                      = (known after apply)
      ~ placement_partition_number           = 0 -> (known after apply)
      ~ primary_network_interface_id         = "eni-0176dd2b1b41b7061" -> (known after apply)
      ~ private_dns                          = "ip-172-18-0-20.eu-west-1.compute.internal" -> (known after apply)
      ~ private_ip                           = "172.18.0.20" -> (known after apply)
      + public_dns                           = (known after apply)
      + public_ip                            = (known after apply)
      ~ secondary_private_ips                = [] -> (known after apply)
      ~ security_groups                      = [] -> (known after apply)
      + spot_instance_request_id             = (known after apply)
        tags                                 = {
            "Name" = "ec2-2"
        }
      ~ tenancy                              = "default" -> (known after apply)
      + user_data                            = (known after apply)
      + user_data_base64                     = (known after apply)
      ~ vpc_security_group_ids               = [
          - "sg-0dfc7030ac8beb2cc",
        ] -> (known after apply)
        # (9 unchanged attributes hidden)

      - capacity_reservation_specification {
          - capacity_reservation_preference = "open" -> null
        }

      - cpu_options {
          - core_count       = 1 -> null
          - threads_per_core = 1 -> null
        }

      - credit_specification {
          - cpu_credits = "standard" -> null
        }

      - enclave_options {
          - enabled = false -> null
        }

      - maintenance_options {
          - auto_recovery = "default" -> null
        }

      - metadata_options {
          - http_endpoint               = "enabled" -> null
          - http_put_response_hop_limit = 1 -> null
          - http_tokens                 = "optional" -> null
          - instance_metadata_tags      = "disabled" -> null
        }

      - private_dns_name_options {
          - enable_resource_name_dns_a_record    = false -> null
          - enable_resource_name_dns_aaaa_record = false -> null
          - hostname_type                        = "ip-name" -> null
        }

      - root_block_device {
          - delete_on_termination = true -> null
          - device_name           = "/dev/xvda" -> null
          - encrypted             = false -> null
          - iops                  = 100 -> null
          - tags                  = {} -> null
          - throughput            = 0 -> null
          - volume_id             = "vol-036e10bcf6d7517a5" -> null
          - volume_size           = 8 -> null
          - volume_type           = "gp2" -> null
        }
    }

Plan: 1 to add, 0 to change, 1 to destroy.
Terraform is going to destroy the existing ec2-2 instance and will create a new one. As you can read from the plan details, the update of the attribute associate_public_ip_address forces the replacement of the machine.
We confirm with yes and we wait for the plan to be applied.
Visually Confirm Public IP Address
Let's confirm the public IP address of the ec2-2 machine.

Connection to ec2-2 machine is not possible yet
But, are we now able to connect to the ec2-2 machine?
The standard shell command to connect to the machine would be the following:
$ ssh -i ./id_rsa ec2-user@34.248.88.20
where 34.248.88.20 is the public IP address of the ec2-2 machine. Yours will be different 😊. Use your own ec2-2 machine public IP address.
If you try the above command (with your ec2-2 machine public IP address), you will not succeed in connecting.
There are some reasons why this is happening. We have already given you some hints about these, earlier in this blog post.
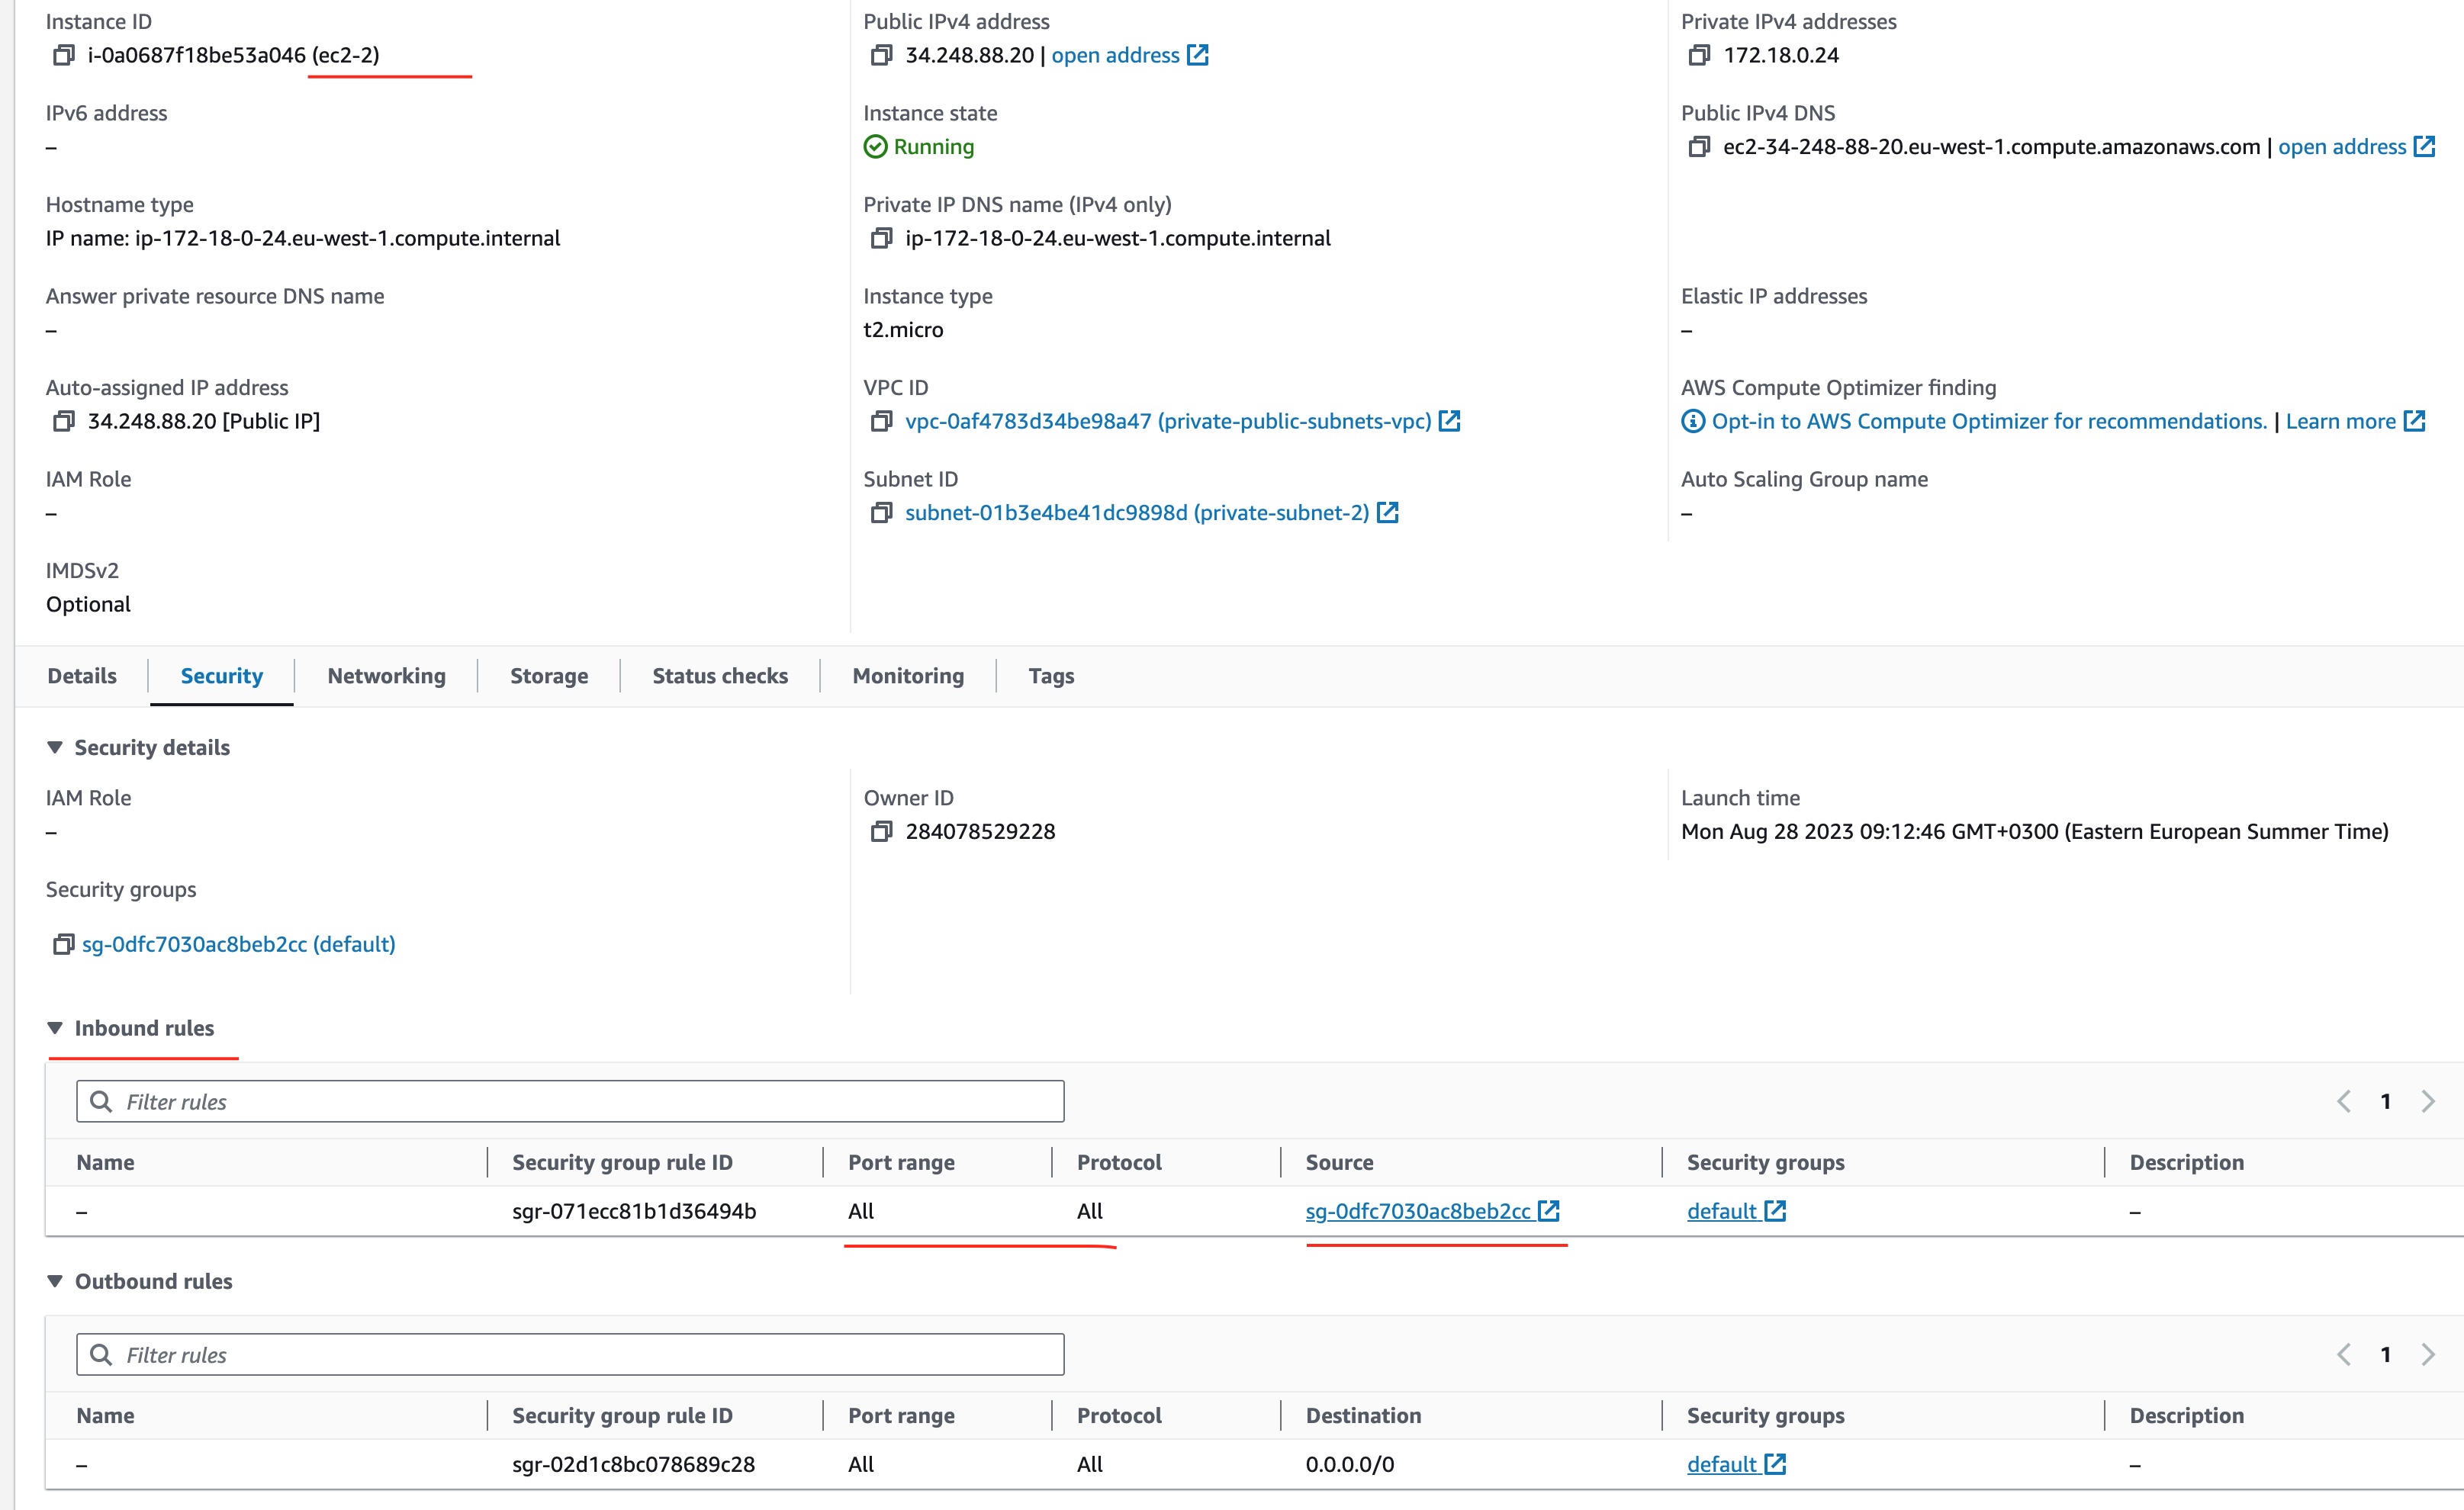
Firstly, there is a VPC default security group that allows incoming traffic only from sources that are attached to the default security group. And our laptop is not such a machine.
You can confirm that by looking at the Security tab on the details page of the ec2-2 instance:
Hence we proceed to step 6 to allow any-IP incoming traffic to the standard ssh port (22)
Step 6 - Allow ec2-2 any-IP Incoming Traffic to Standard SSH Port
In this step, we are going to create a new Security Group that will allow incoming traffic to port 22, which is the standard ssh port.
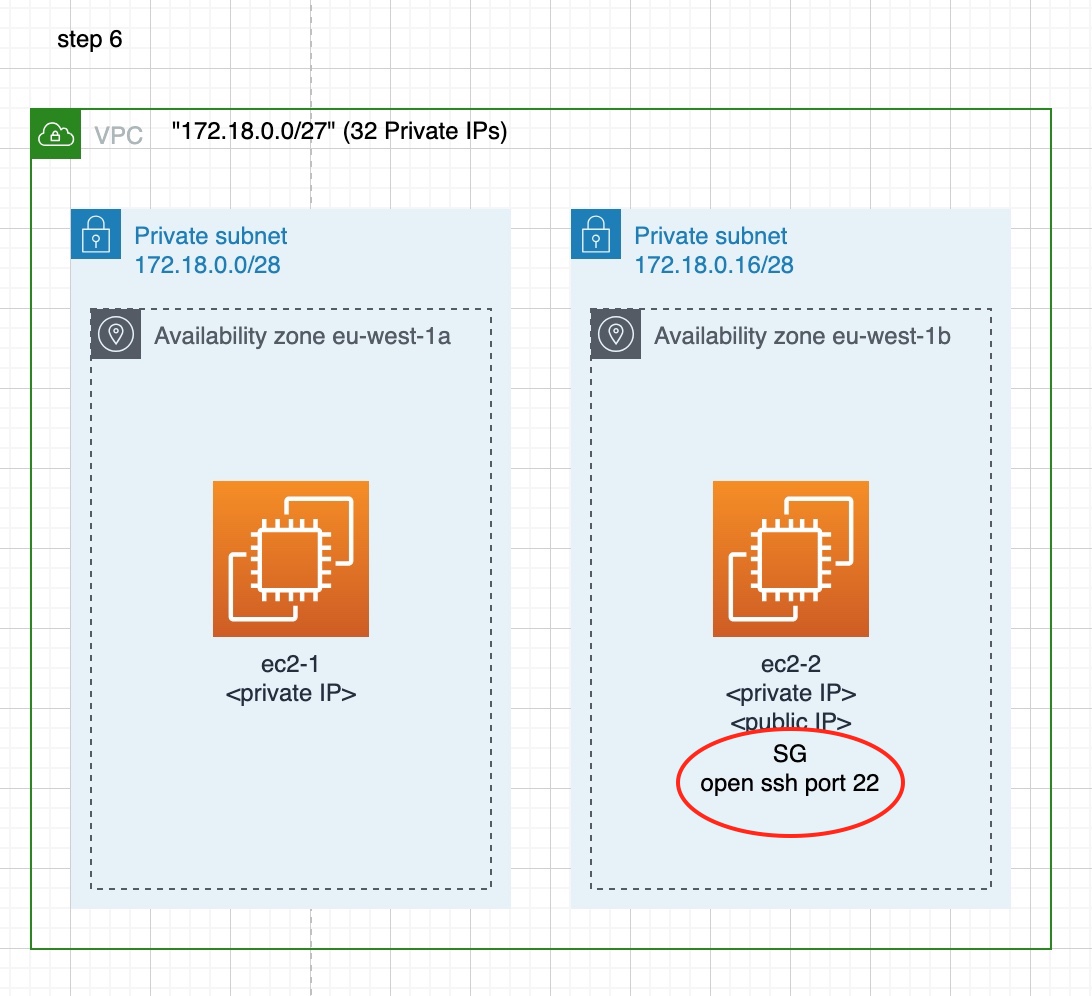
Besides the creation of the new SG, we will also attach it to the ec2-2 machine. Hence, we essentially open this port (22) on this machine.
Provision New Security Group
Allow SSH Traffic
First, we create the file ssh_access.tf with the following content:
The SG has ingress and egress rules. The ingress rules specify which incoming traffic is allowed.
The egress rules specify which outgoing traffic is allowed.
In our case, the ingress rule allows incoming traffic on port 22 from any IP address (0.0.0.0/0). The egress rule allows any outgoing traffic.
Attach SG to ec2-2 Machine
Before we create the SG, we need to associate it with the ec2-2 machine.
We amend the file ec2.tf by adding a reference to the security group as follows:
...
resource "aws_instance" "ec2_2" {
  ...
  vpc_security_group_ids = [
    aws_security_group.ssh_access.id
  ]
  ...
}
...
output "ssh_command_to_connect_to_ec2_2_machine" {
  value       = "ssh -i ./id_rsa ec2-user@${aws_instance.ec2_2.public_ip}"
  description = "ssh command to connect to ec2-2 machine from the external world"
}
Look at the output value that we generate. Since every time we amend the ec2-2 terraform configuration, terraform might generate a new
machine with a new public IP, it is useful to get the ssh command to connect to that machine as an output of the terraform apply command.
Terraform Apply
With these changes in place, let's apply the new terraform configuration:
$ terraform apply
...
We are being presented with the following plan:
  # aws_instance.ec2_2 will be updated in-place
  ~ resource "aws_instance" "ec2_2" {
        id                                   = "i-0a0687f18be53a046"
        tags                                 = {
            "Name" = "ec2-2"
        }
      ~ vpc_security_group_ids               = [
          - "sg-0dfc7030ac8beb2cc",
        ] -> (known after apply)
        # (31 unchanged attributes hidden)

        # (8 unchanged blocks hidden)
    }

  # aws_security_group.ssh_access will be created
  + resource "aws_security_group" "ssh_access" {
      + arn                    = (known after apply)
      + description            = "Allow SSH traffic from anywhere"
      + egress                 = [
          + {
              + cidr_blocks      = [
                  + "0.0.0.0/0",
                ]
              + description      = "Outgoing to anywhere"
              + from_port        = 0
              + ipv6_cidr_blocks = []
              + prefix_list_ids  = []
              + protocol         = "-1"
              + security_groups  = []
              + self             = false
              + to_port          = 0
            },
        ]
      + id                     = (known after apply)
      + ingress                = [
          + {
              + cidr_blocks      = [
                  + "0.0.0.0/0",
                ]
              + description      = "allow SSH from anywhere"
              + from_port        = 22
              + ipv6_cidr_blocks = []
              + prefix_list_ids  = []
              + protocol         = "tcp"
              + security_groups  = []
              + self             = false
              + to_port          = 22
            },
        ]
      + name                   = "private-public-subnets-ssh-access"
      + name_prefix            = (known after apply)
      + owner_id               = (known after apply)
      + revoke_rules_on_delete = false
      + tags                   = {
          + "Name" = "private-public-subnets-ssh-access"
        }
      + tags_all               = {
          + "Name"      = "private-public-subnets-ssh-access"
          + "project"   = "private-public-subnets"
          + "terraform" = "1"
        }
      + vpc_id                 = "vpc-0af4783d34be98a47"
    }

Plan: 1 to add, 1 to change, 0 to destroy.
As you can see, terraform will create the new SG and will attach it to the ec2-2` machine.
We confirm with yes.
At the successful completion of the terraform plan application, we see the Outputs: that is telling us how we can connect to the ec2-2 machine:
Outputs:

ssh_command_to_connect_to_ec2_2 = "ssh -i ./id_rsa ec2-user@34.248.88.20"
Is Connection Now Possible?
If you try to connect by running the following command:
$ ssh -i ./id_rsa ec2-user@34.248.88.20
...
you will not be able to connect again (😕).
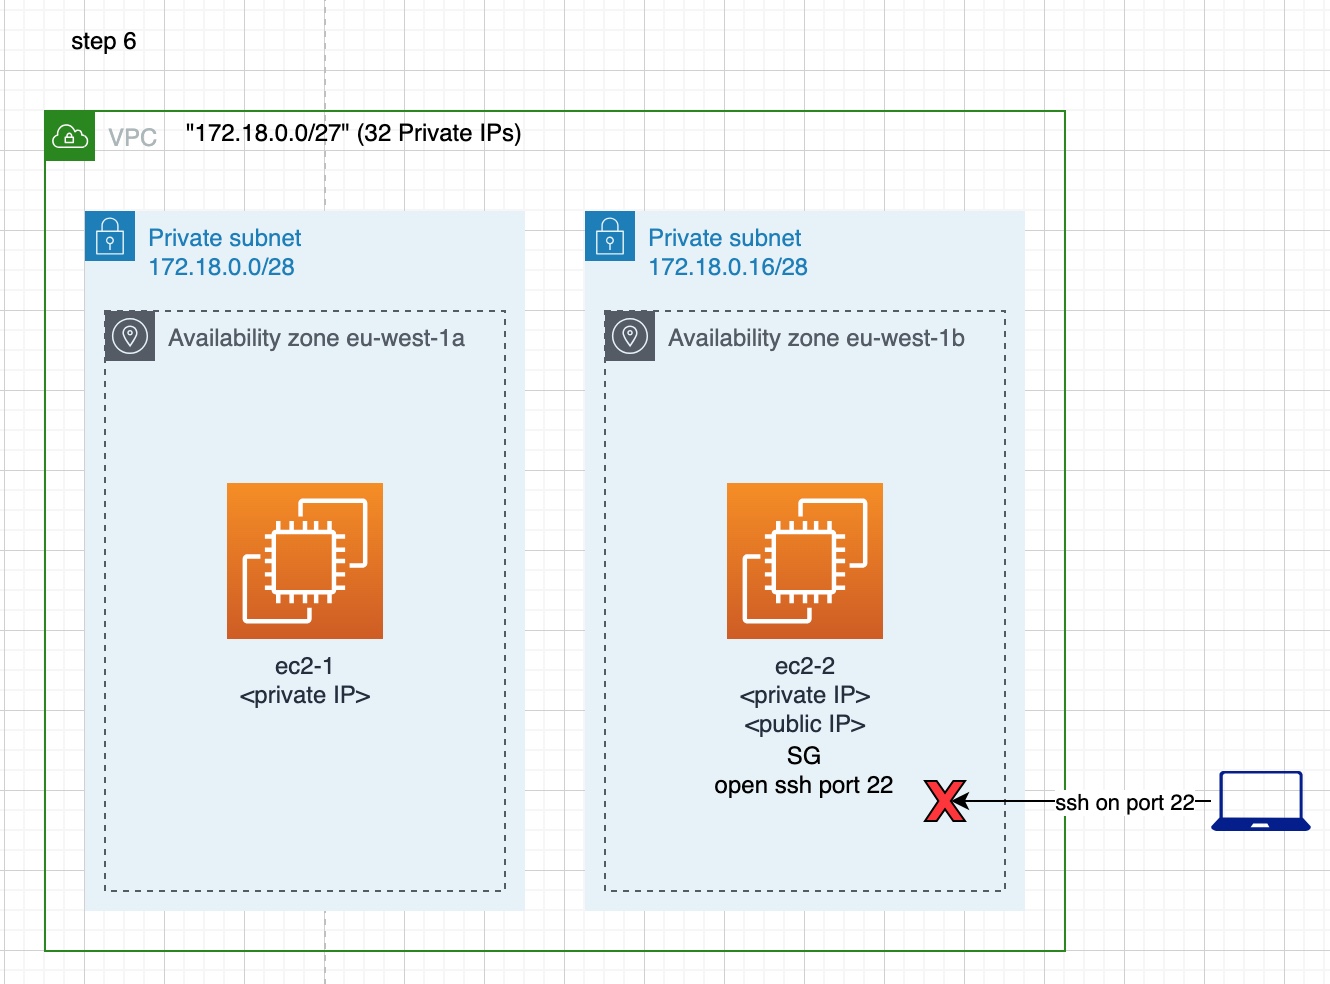
But,
- We have assigned a public IP to the
ec2-2machine. - We have opened the incoming traffic to the
ec2-2machine with the new security group.
What else do we have to do to make the ec2-2 accessible from public Internet?
Although the ec2-2 machine has been made public, the problem is that it lives inside a subnet which is still private. We need something more in order to make the subnet of the ec2-2 machine public too.
Let's move on to step number 7.
Step 7 - Turn Subnet 2 to Public
Turning a subnet from private to public involves the following steps:
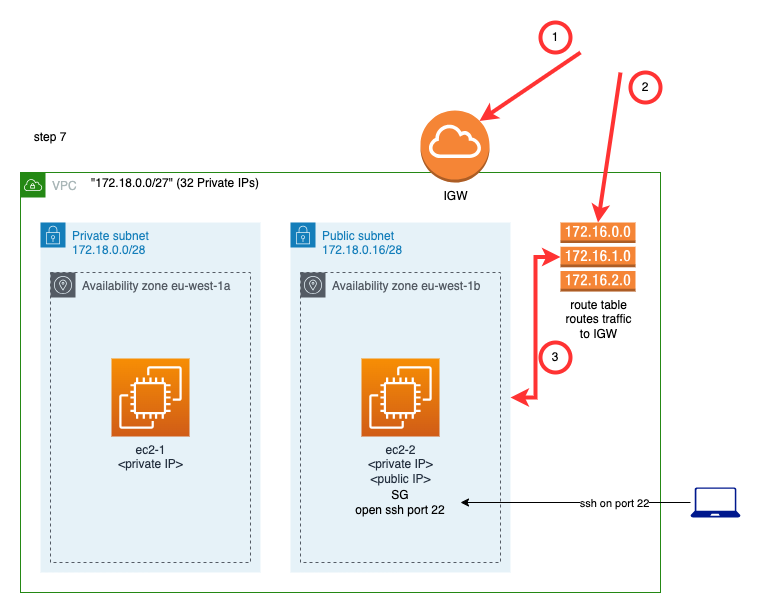
- We need to create an Internet Gateway
- We need to create a new Route Table that would route traffic to the Internet Gateway
- This new Route Table needs to be explicitly associated to the subnet.
Provision Internet Gateway
The provisioning of an Internet Gateway is done with the following terraform configuration file:
This is quite simple. We just use the resource aws_internet_gateway which requires minimum information, the VPC the Internet Gateway is going to be attached to.
Provision new Route Table
The new Route Table is provisioned with the following terraform configuration file:
route_table_to_internet_gateway.tf
- The aws_route_table resource is attached to the VPC. It creates an empty Route Table.
- The aws_route resource creates an entry inside the Route Table. The new entry/route is sending all outgoing traffic (
0.0.0.0/0) to the internet gateway.
Provision Association of Route Table to 2nd Subnet
Finally, we amend the file vpc_subnets.tf so that:
- we change the name of the 2nd subnet to be
public-subnet-2, and - we associate the new Route Table to the 2nd subnet
The amendments to the vpc_subnets.tf file are given below as a diff:
--- a/vpc_subnets.tf
+++ b/vpc_subnets.tf
@@ -12,8 +12,13 @@ resource "aws_subnet" "subnet_2" {
   availability_zone = "eu-west-1b"
   cidr_block        = "172.18.0.16/28"
   tags = {
-    "Name" = "private-subnet-2"
+    "Name" = "public-subnet-2"
   }

   vpc_id = aws_vpc.private_and_public_subnets.id
 }
+
+resource "aws_route_table_association" "public_subnet" {
+  subnet_id      = aws_subnet.subnet_2.id
+  route_table_id = aws_route_table.to_internet_gateway.id
+}
Terraform Apply
With these amendments in place, let's apply the terraform configuration:
$ terraform apply
...
The plan presented is the following:
  # aws_internet_gateway.private_and_public_subnets will be created
  + resource "aws_internet_gateway" "private_and_public_subnets" {
      + arn      = (known after apply)
      + id       = (known after apply)
      + owner_id = (known after apply)
      + tags     = {
          + "Name" = "igw"
        }
      + tags_all = {
          + "Name"      = "igw"
          + "project"   = "private-public-subnets"
          + "terraform" = "1"
        }
      + vpc_id   = "vpc-0738edea58dba44bb"
    }

  # aws_route.to_internet_gateway will be created
  + resource "aws_route" "to_internet_gateway" {
      + destination_cidr_block = "0.0.0.0/0"
      + gateway_id             = (known after apply)
      + id                     = (known after apply)
      + instance_id            = (known after apply)
      + instance_owner_id      = (known after apply)
      + network_interface_id   = (known after apply)
      + origin                 = (known after apply)
      + route_table_id         = (known after apply)
      + state                  = (known after apply)
    }

  # aws_route_table.to_internet_gateway will be created
  + resource "aws_route_table" "to_internet_gateway" {
      + arn              = (known after apply)
      + id               = (known after apply)
      + owner_id         = (known after apply)
      + propagating_vgws = (known after apply)
      + route            = (known after apply)
      + tags             = {
          + "Name" = "access-to-internet"
        }
      + tags_all         = {
          + "Name"      = "access-to-internet"
          + "project"   = "private-public-subnets"
          + "terraform" = "1"
        }
      + vpc_id           = "vpc-0738edea58dba44bb"
    }

  # aws_route_table_association.public_subnet will be created
  + resource "aws_route_table_association" "public_subnet" {
      + id             = (known after apply)
      + route_table_id = (known after apply)
      + subnet_id      = "subnet-00087d63834b41f2d"
    }

  # aws_subnet.subnet_2 will be updated in-place
  ~ resource "aws_subnet" "subnet_2" {
        id                                             = "subnet-00087d63834b41f2d"
      ~ tags                                           = {
          ~ "Name" = "private-subnet-2" -> "public-subnet-2"
        }
      ~ tags_all                                       = {
          ~ "Name"      = "private-subnet-2" -> "public-subnet-2"
            # (2 unchanged elements hidden)
        }
        # (15 unchanged attributes hidden)
    }

Plan: 4 to add, 1 to change, 0 to destroy.
We confirm with yes and we wait for the plan to be applied.
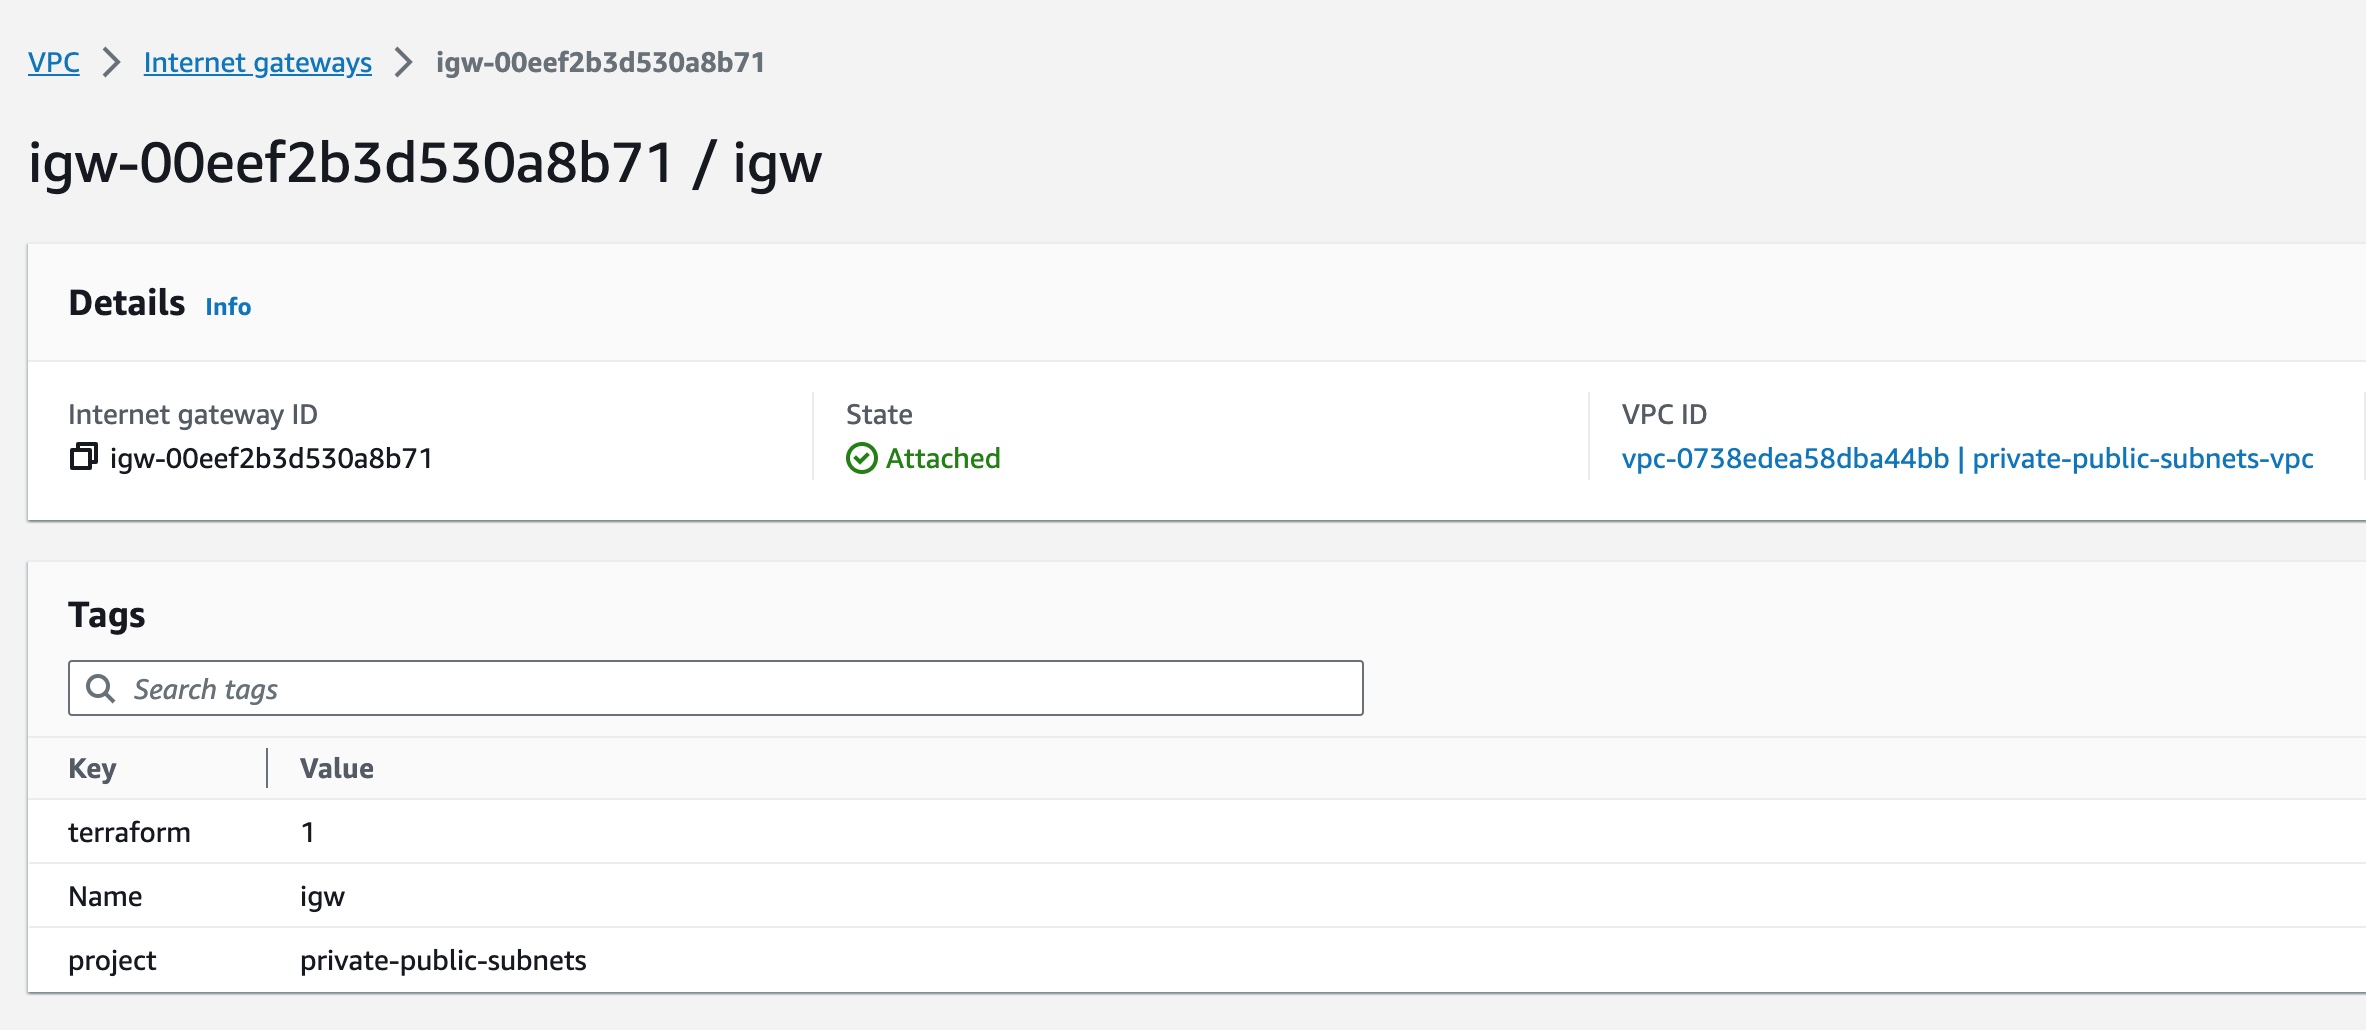
Visually Confirm Internet Gateway
You can inspect the Internet Gateway details if you go to the VPC Management Console and select Internet Gateways:
Visually Confirm Route Table
The Route Table details can be inspected in the VPC Management Console if you select Route Tables:
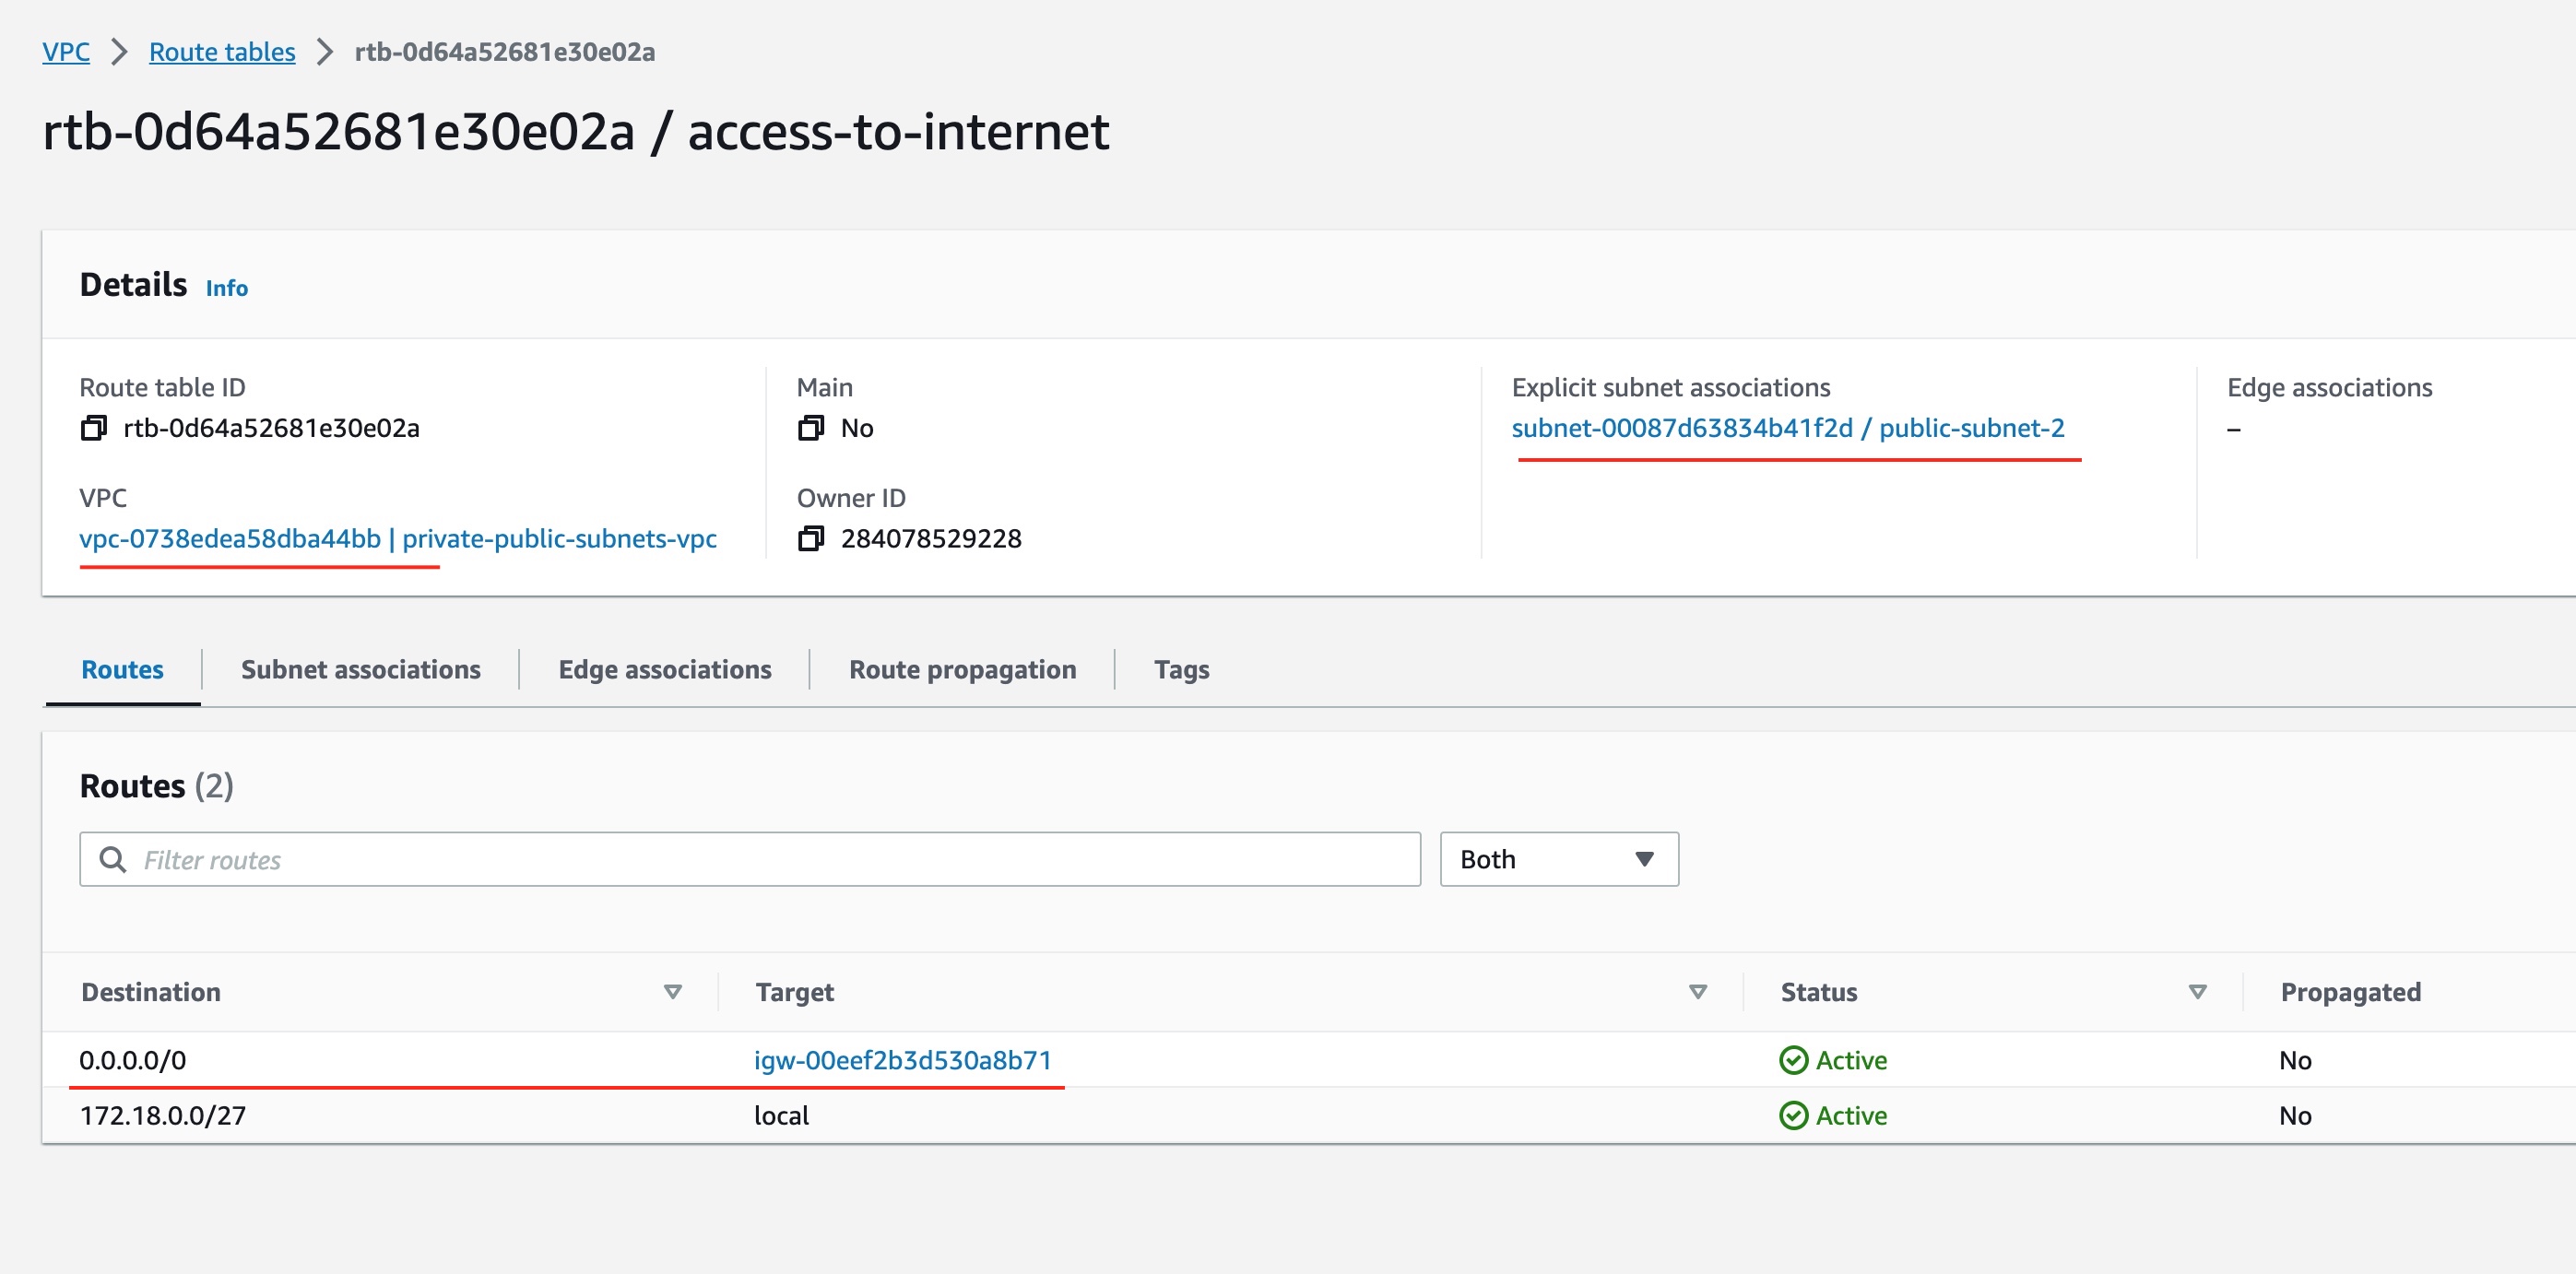
You can see that this Route Table is explicitly associated to our 2nd subnet. Also, you can see that it has a route entry that routes any traffic to 0.0.0.0/0 address to the Internet Gateway that we have created.
Connect to ec2-2 Machine
We have turned the subnet 2 to a public subnet. Can we now connect to the ec2-2 machine?
Let's try the ssh command that is suggested by the terraform output.
Hint: You can run the command
terraform outputany time you want to see the ouput values for your terraform state.
$ ssh -i ./id_rsa ec2-user@46.137.11.135
The authenticity of host '46.137.11.135 (46.137.11.135)' can't be established.
ED25519 key fingerprint is SHA256:ekRkwpS4vi1Uk1abyBtH6jSfogQA8mRGOcX5cnvHo4I.
This key is not known by any other names
Are you sure you want to continue connecting (yes/no/[fingerprint])? yes
Warning: Permanently added '46.137.11.135' (ED25519) to the list of known hosts.

       __|  __|_  )
       _|  (     /   Amazon Linux 2 AMI
      ___|\___|___|

https://aws.amazon.com/amazon-linux-2/
[ec2-user@ip-172-18-0-21 ~]$
Boom 💥! It worked!
We have made subnet 2 public and we are allowed to connect to the ec2-2 machine that lives inside it.
And not only that. We can also connect from the ec2-2 machine to the outside world. From inside the ec2-2 shell, try the following command:
[ec2-user@ip-172-18-0-21 ~]$ ping 8.8.8.8
PING 8.8.8.8 (8.8.8.8) 56(84) bytes of data.
64 bytes from 8.8.8.8: icmp_seq=1 ttl=109 time=0.998 ms
64 bytes from 8.8.8.8: icmp_seq=2 ttl=109 time=0.987 ms
64 bytes from 8.8.8.8: icmp_seq=3 ttl=109 time=0.991 ms
This proves that the ec2-2 machine is allowed to connect to the outside world.
Step 8 - Access Private EC2 Machine
So far so good. But we still have an EC2 machine that we haven't been able to connect to.
The ec2-1 machine.
Normally, we want to be able to connect to this machine from within VPC machines. In other words,
we would like to be able to connect from ec2-2 machine. Also, we would like to be able to connect
from ec2-1 machine to public Internet in order to be able to download software packages.
But, firstly, let's sort out the first need. How can we make a connection from ec2-2 machine to the
ec2-1 machine, using, for example, ssh?
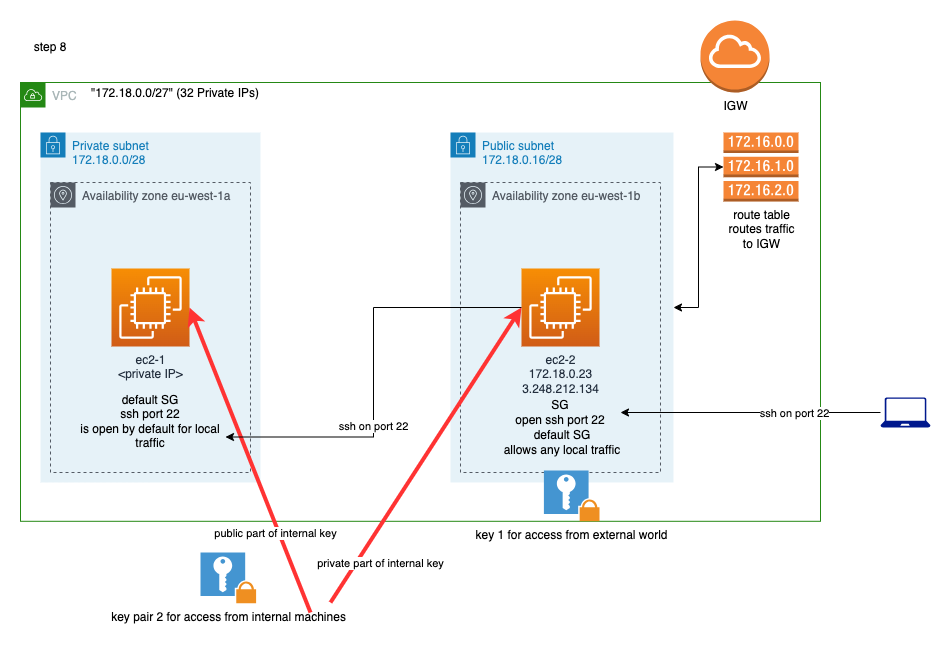
As it is depicted above, we will need a new pair of public/private keys. This is going to be used only for internal to VPN communication.
We are going to store the private part of it in the ec2-2 machine and the public part of it in the ec2-1 machine. Hence, we will be able to initiate ssh connection from ec2-2 machine to ec2-1.
Generate Second Key Pair
We use the command ssh-keygen -m PEM to generate a second key pair.
Important
- We don't specify a passphrase
- We specify the file name to be
./id_rsa_internal
At the end of this process we will have two more files in our working folder:
id_rsa_internalid_rsa_internal.pub
Provision the Second Key Pair
We create the file ec2_key_pair_internal.tf with the following terraform configuration:
This is similar to how we provisioned the first key pair.
Associate ec2-1 with Second Key Pair
Then we change the contents of the file ec2.tf so that the ec2_1 aws_instance to reference the
new, internal, key pair, instead of the first key pair.
(given as a diff)
...
resource "aws_instance" "ec2_1" {
  ...
-  key_name                    = aws_key_pair.private_public_subnets.key_name
+  key_name                    = aws_key_pair.internal_to_vpc.key_name
...
Provision the Private Part to ec2-2 Machine
Now, we have to upload the private part (id_rsa_internal) of the new key pair onto the ec2-2 machine.
This is done with the help of the following terraform configuration:
(given as a diff)
resource "aws_instance" "ec2_2" {
  ...
+
+  connection {
+    type        = "ssh"
+    user        = "ec2-user"
+    host        = self.public_ip
+    private_key = file("./id_rsa")
+  }
+
+  provisioner "file" {
+    source      = "./id_rsa_internal"
+    destination = "/home/ec2-user/.ssh/id_rsa_internal"
+  }
+
+  provisioner "remote-exec" {
+    inline = [
+      "chmod 400 /home/ec2-user/.ssh/id_rsa_internal"
+    ]
+  }
...
}
We use
- the connection, to specify how the following
"file"and"remote-exec"provisioners are going to connect to theec2-2machine to upload the private file (id_rsa_internal). Note that theconnectionsettings are prescribing ansshtype of connection from our local laptop/machine toec2-2. Hence, theprivate_keyneeded for this connection is the key defined inside the./id_rsafile. - the
file
provisioner, to upload a local file to a remote folder/file. This is how we will upload the local file./id_rsa_internaltoec2-2machine, in its folder/home/ec2-user/.ssh. - the
remote-exec
provisioner, to make the remoteid_rsa_internalfile have the correct permissions to work withssh.
Important The
"file"and"remote-exec"provisioners are only executed when the resource they live in is first created. Now that theec2-2machine is already created, these blocks will not be executed. We have some options on how we can trigger these blocks. It will be discussed later.
Output Connection Command to Connect to ec2-1
Like we do for the ssh command to connect to ec2-2 machine, it will be quite helpful to have, as output, the command
to connect from ec2-2 to ec2-1 machine.
Amend the ec2.tf file to include the following output:
output "ssh_command_to_connect_to_ec2_1" {
  value       = "ssh -i ~/.ssh/id_rsa_internal ec2-user@${aws_instance.ec2_1.private_ip}"
  description = "This is how you can connect to the EC2 1 machine from EC2 2 machine"
}
Make sure ec2-2 belongs to Default Security Group
There is a small detail that needs to be fixed last. When we associated ec2-2 to the ssh_access Security Group, it has been implicitly disassociated from the default Security Group.
Look at the Security Groups of the ec2-2 machine:
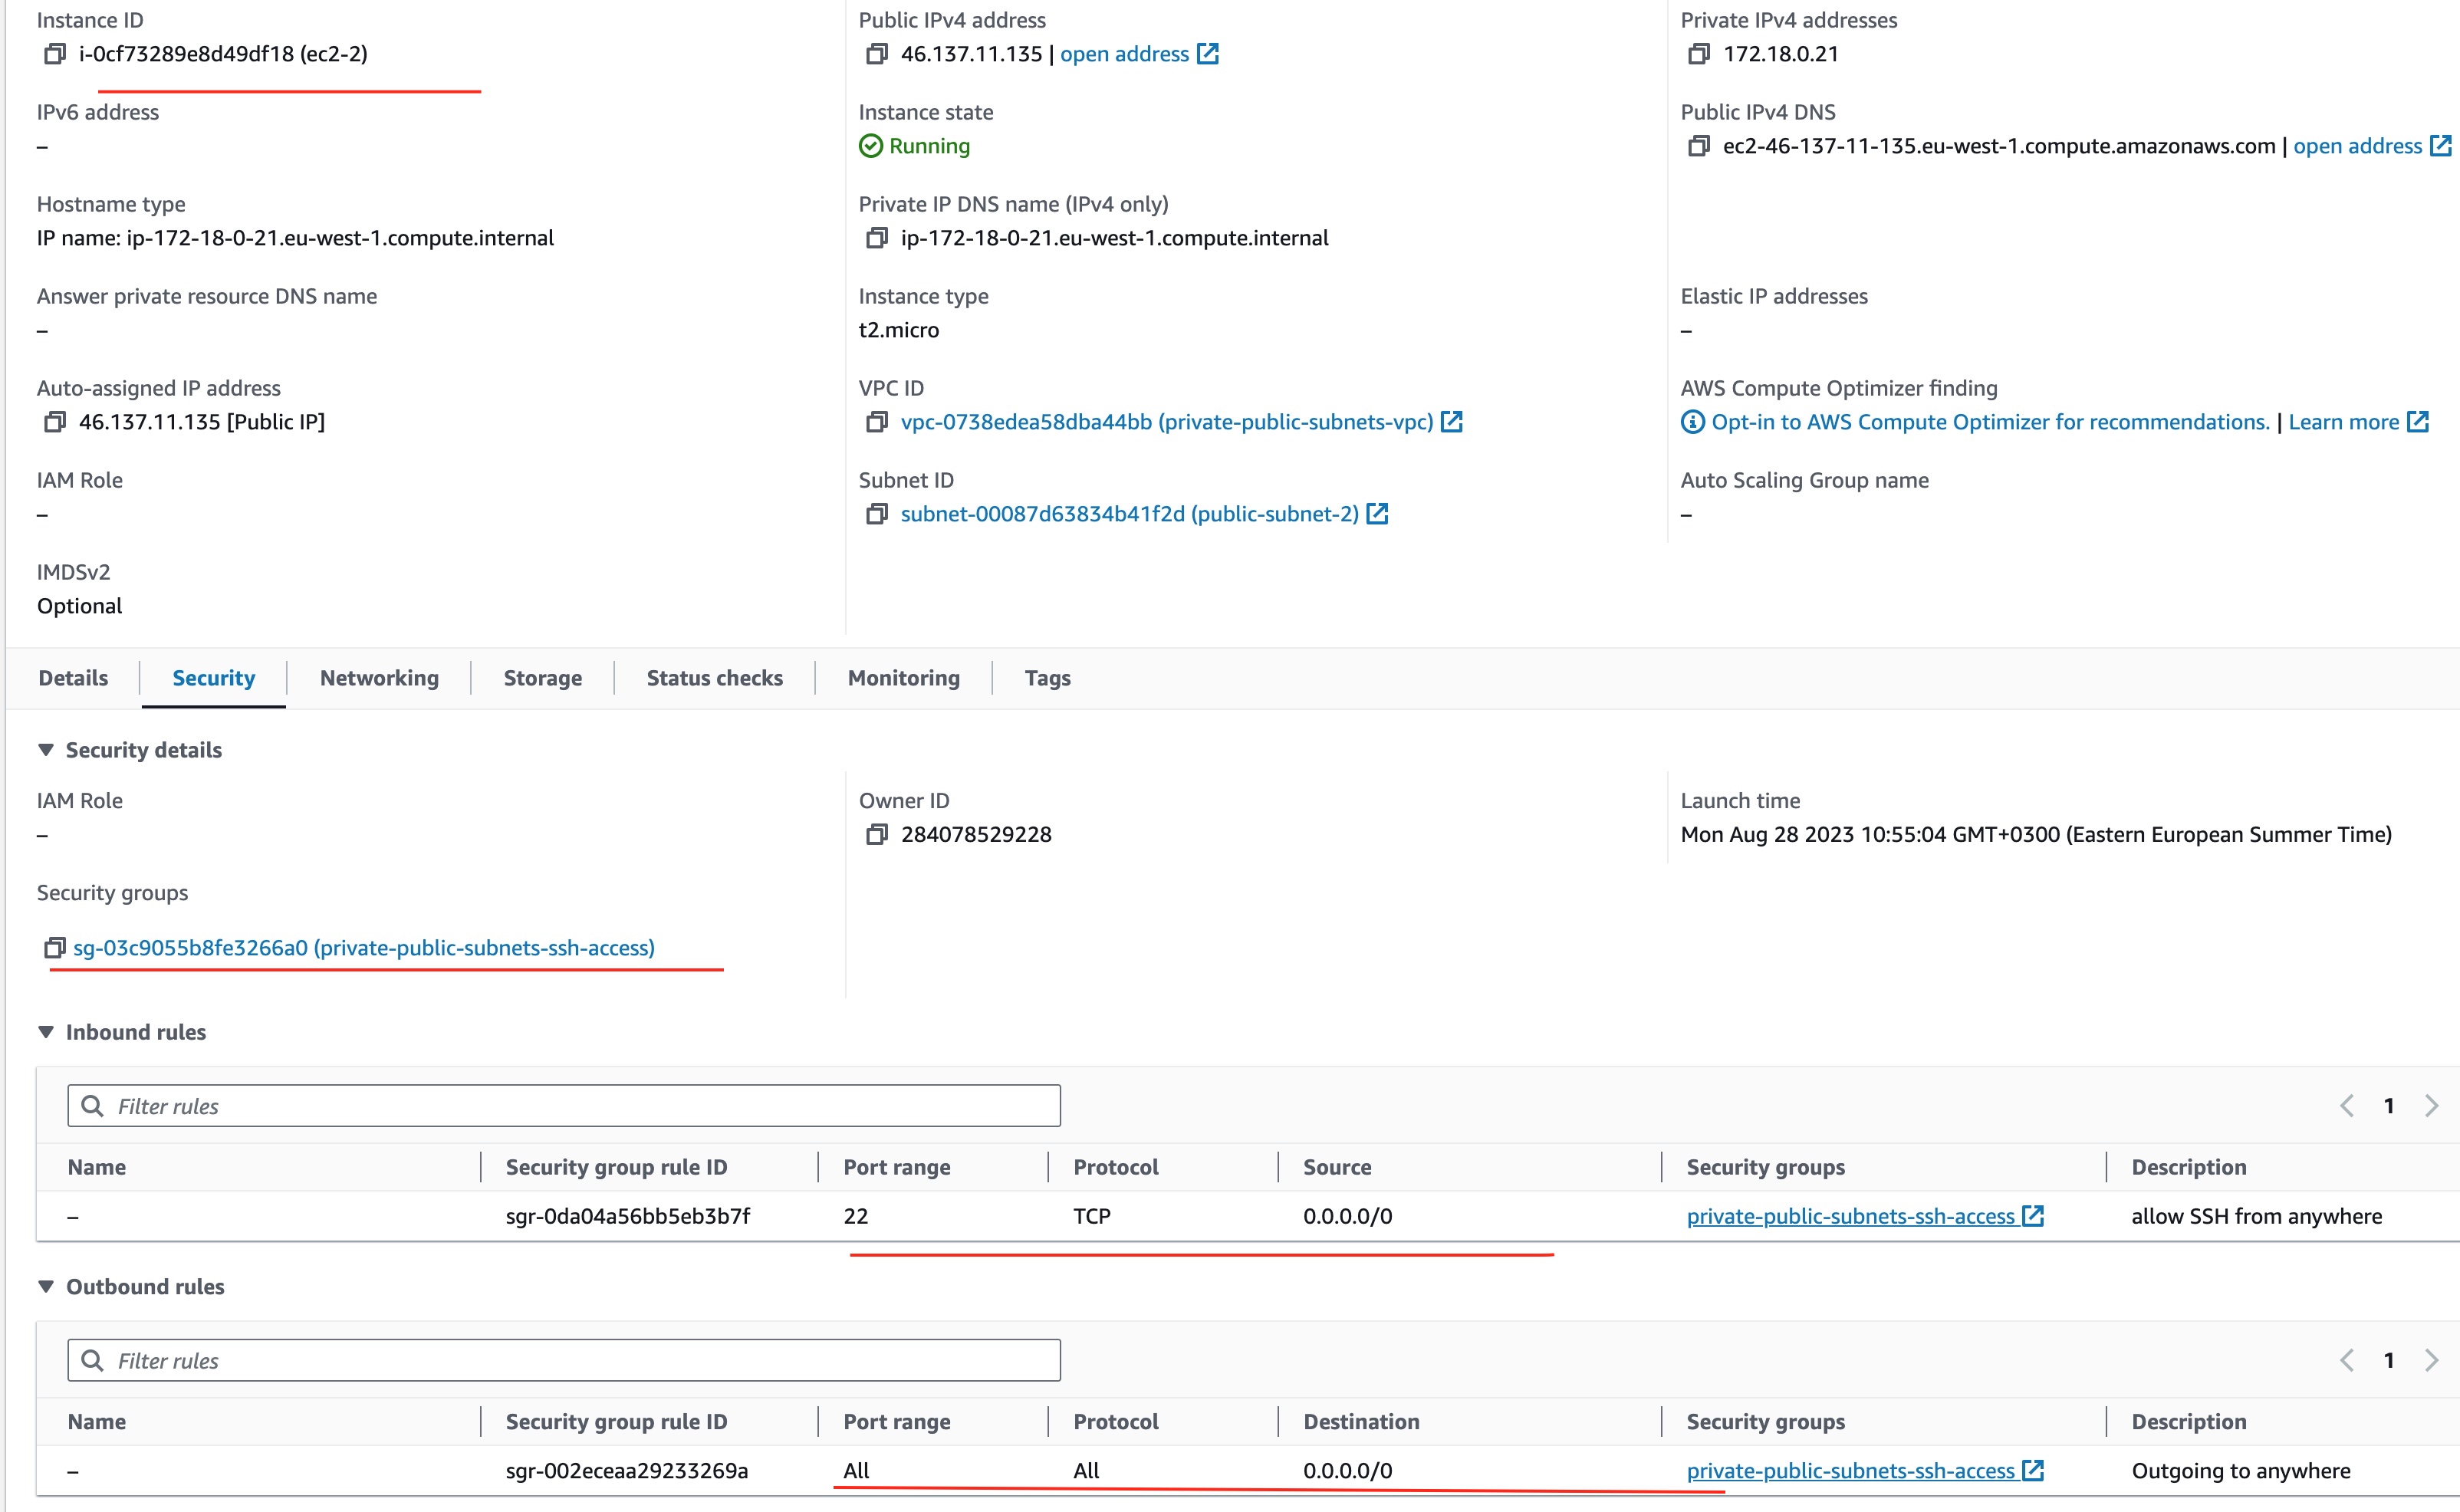
You can see that it only belongs to the ssh access security group.
On the other hand, the ec2-1 machine is associated only to the default Security Group and allows incoming traffic only from machines that belong to the default Security Group:
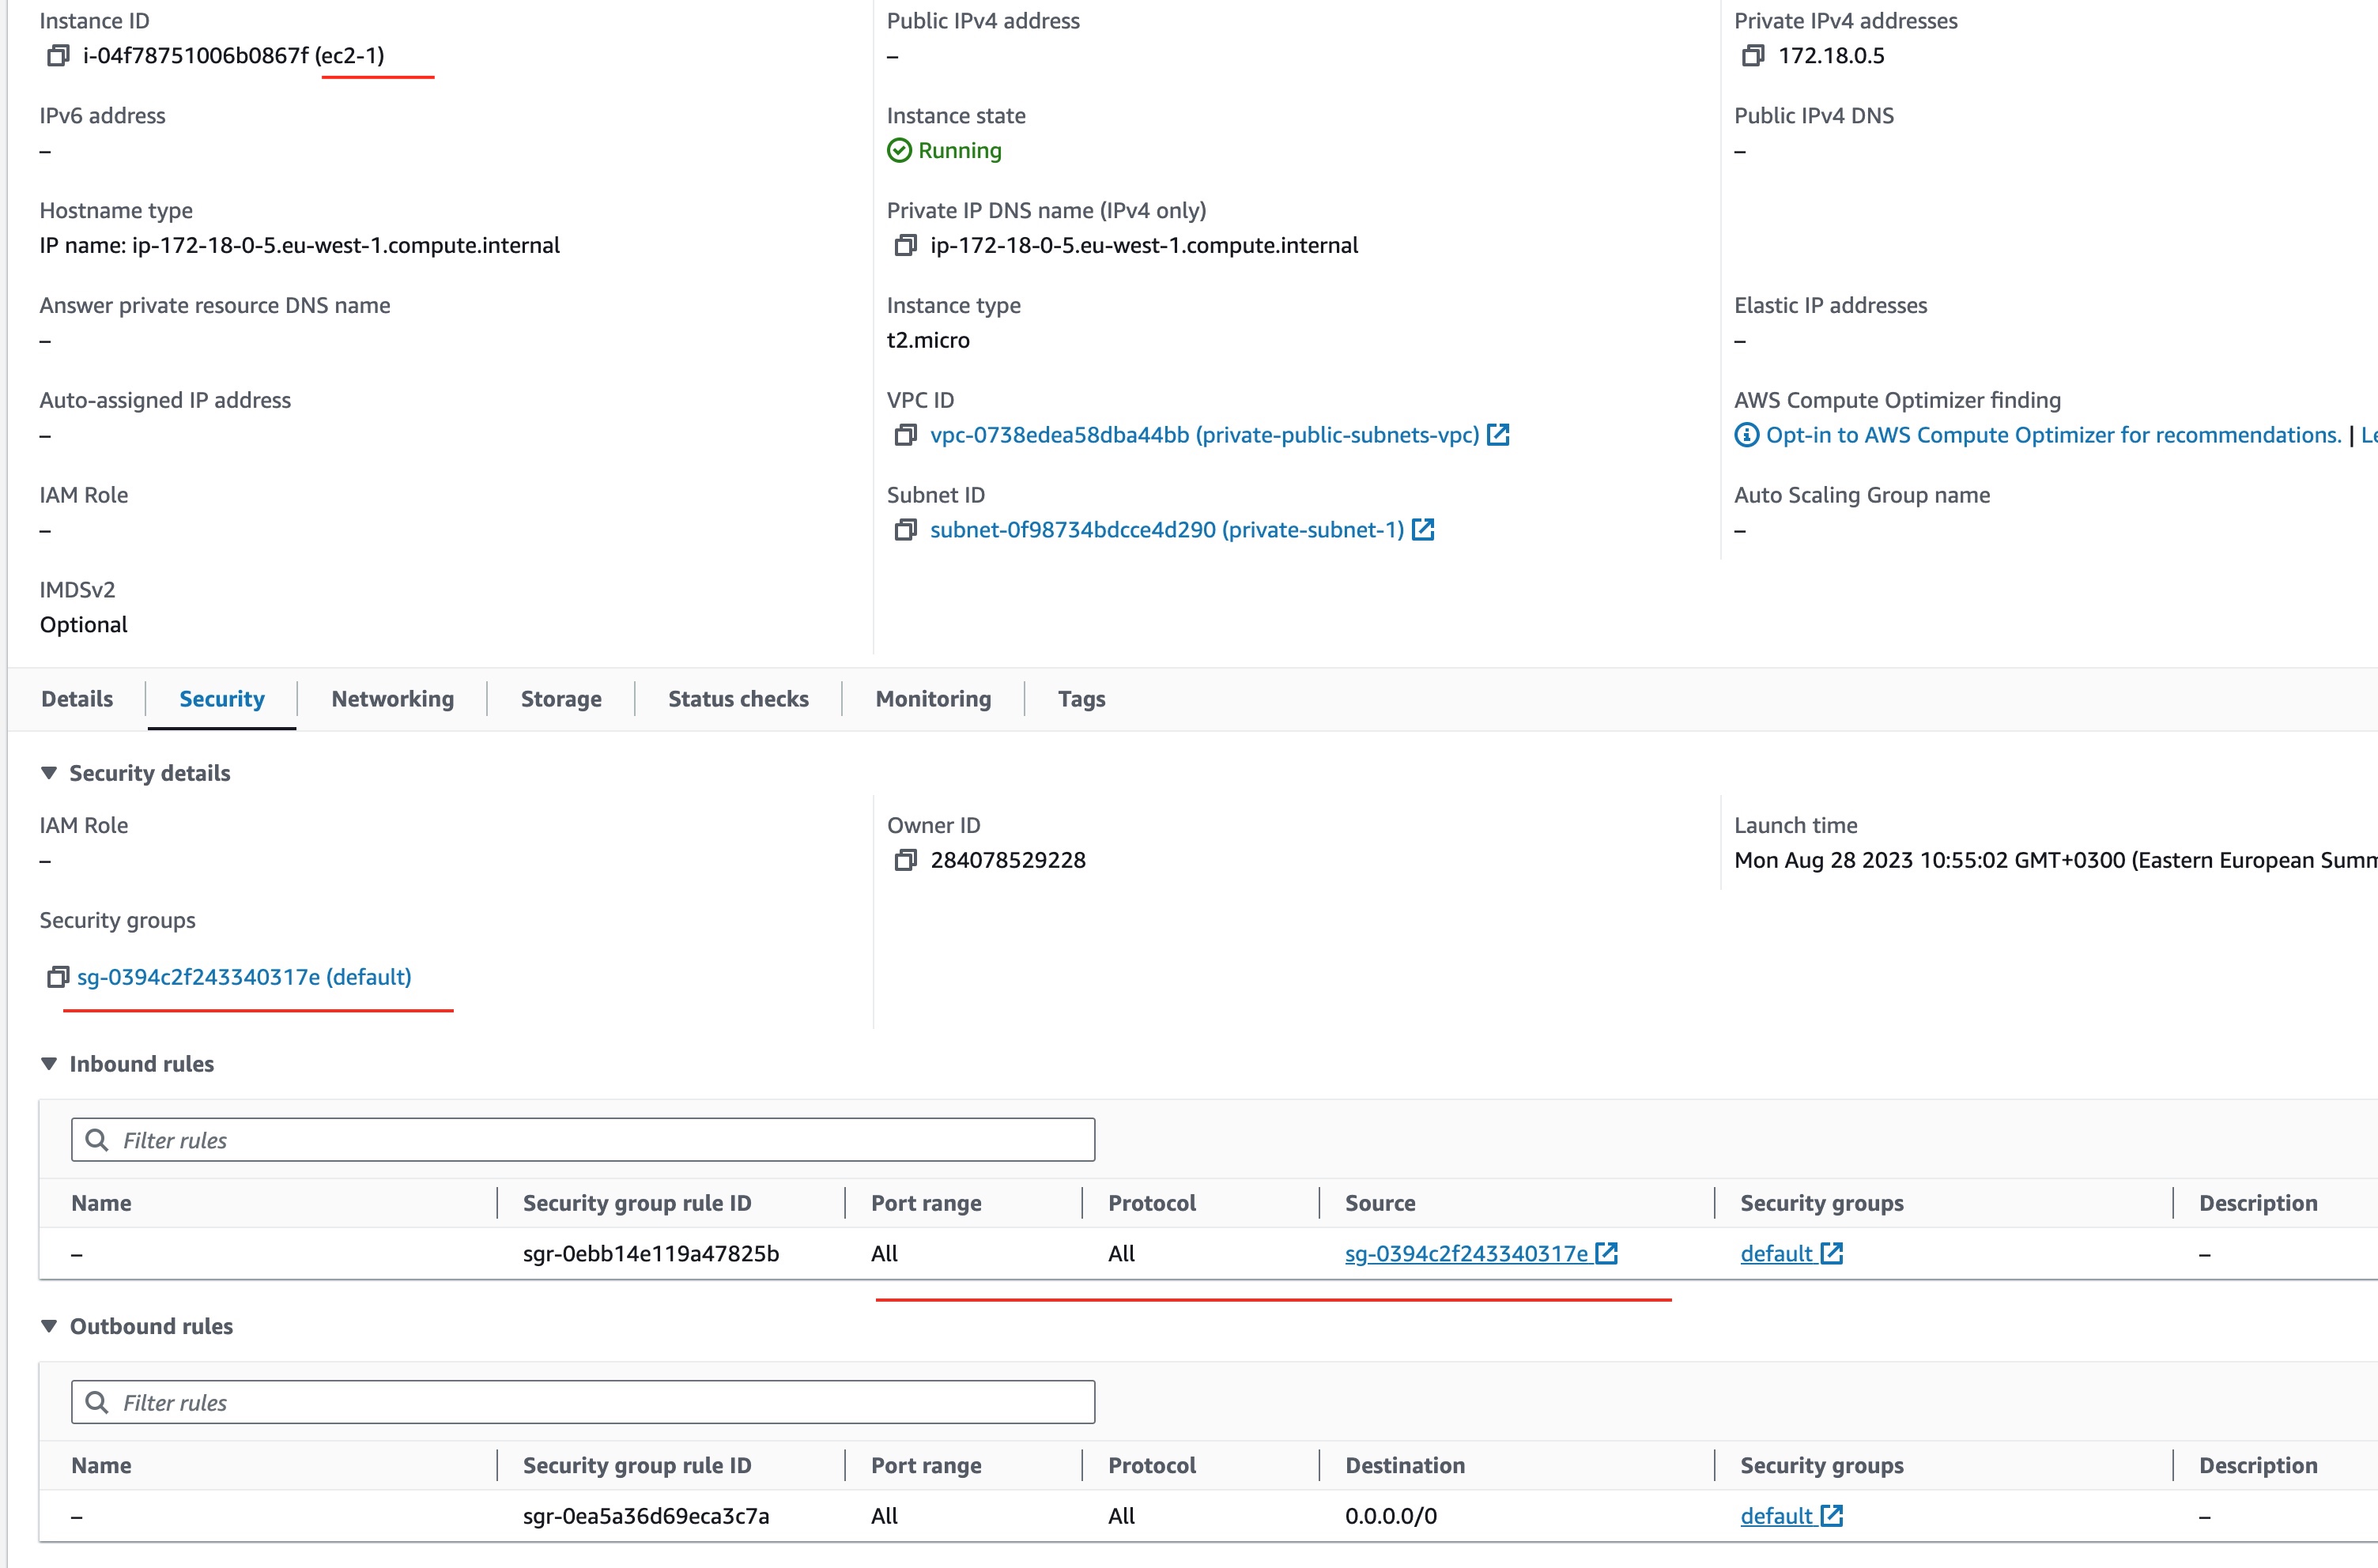
Since the ec2-2 machine is not associated to the default Security Group, which is the only Security Group that ec2-1 accepts incoming traffic from, it will not be able to ssh to ec2-1 machine.
Hence, we have to add the default Security Group back into the associated Security Groups of ec2-2.
Amend the file ec2.tf so that:
(displayed as diff)
...
resource "aws_instance" "ec2_2" {
  ...
    vpc_security_group_ids = [
+    aws_vpc.private_and_public_subnets.default_security_group_id,
     aws_security_group.ssh_access.id
   ]
   ...
}
...
Terraform Apply
We are ready to apply the changes. Let's execute:
$ terraform apply
...
The plan that is suggested is the following
  # aws_instance.ec2_1 must be replaced
-/+ resource "aws_instance" "ec2_1" {
      ~ arn                                  = "arn:aws:ec2:eu-west-1:284078529228:instance/i-04f78751006b0867f" -> (known after apply)
      ~ cpu_core_count                       = 1 -> (known after apply)
      ~ cpu_threads_per_core                 = 1 -> (known after apply)
      ~ disable_api_stop                     = false -> (known after apply)
      ~ disable_api_termination              = false -> (known after apply)
      ~ ebs_optimized                        = false -> (known after apply)
      - hibernation                          = false -> null
      + host_id                              = (known after apply)
      + host_resource_group_arn              = (known after apply)
      + iam_instance_profile                 = (known after apply)
      ~ id                                   = "i-04f78751006b0867f" -> (known after apply)
      ~ instance_initiated_shutdown_behavior = "stop" -> (known after apply)
      + instance_lifecycle                   = (known after apply)
      ~ instance_state                       = "running" -> (known after apply)
      ~ ipv6_address_count                   = 0 -> (known after apply)
      ~ ipv6_addresses                       = [] -> (known after apply)
      ~ key_name                             = "private-public-subnets" -> "private-public-subnets-internal" # forces replacement
      ~ monitoring                           = false -> (known after apply)
      + outpost_arn                          = (known after apply)
      + password_data                        = (known after apply)
      + placement_group                      = (known after apply)
      ~ placement_partition_number           = 0 -> (known after apply)
      ~ primary_network_interface_id         = "eni-0d078bff092724a4e" -> (known after apply)
      ~ private_dns                          = "ip-172-18-0-5.eu-west-1.compute.internal" -> (known after apply)
      ~ private_ip                           = "172.18.0.5" -> (known after apply)
      + public_dns                           = (known after apply)
      + public_ip                            = (known after apply)
      ~ secondary_private_ips                = [] -> (known after apply)
      ~ security_groups                      = [] -> (known after apply)
      + spot_instance_request_id             = (known after apply)
        tags                                 = {
            "Name" = "ec2-1"
        }
      ~ tenancy                              = "default" -> (known after apply)
      + user_data                            = (known after apply)
      + user_data_base64                     = (known after apply)
      ~ vpc_security_group_ids               = [
          - "sg-0394c2f243340317e",
        ] -> (known after apply)
        # (9 unchanged attributes hidden)

      - capacity_reservation_specification {
          - capacity_reservation_preference = "open" -> null
        }

      - cpu_options {
          - core_count       = 1 -> null
          - threads_per_core = 1 -> null
        }

      - credit_specification {
          - cpu_credits = "standard" -> null
        }

      - enclave_options {
          - enabled = false -> null
        }

      - maintenance_options {
          - auto_recovery = "default" -> null
        }

      - metadata_options {
          - http_endpoint               = "enabled" -> null
          - http_put_response_hop_limit = 1 -> null
          - http_tokens                 = "optional" -> null
          - instance_metadata_tags      = "disabled" -> null
        }

      - private_dns_name_options {
          - enable_resource_name_dns_a_record    = false -> null
          - enable_resource_name_dns_aaaa_record = false -> null
          - hostname_type                        = "ip-name" -> null
        }

      - root_block_device {
          - delete_on_termination = true -> null
          - device_name           = "/dev/xvda" -> null
          - encrypted             = false -> null
          - iops                  = 100 -> null
          - tags                  = {} -> null
          - throughput            = 0 -> null
          - volume_id             = "vol-0ff99ed5d2b429ce2" -> null
          - volume_size           = 8 -> null
          - volume_type           = "gp2" -> null
        }
    }

  # aws_instance.ec2_2 will be updated in-place
  ~ resource "aws_instance" "ec2_2" {
        id                                   = "i-0cf73289e8d49df18"
        tags                                 = {
            "Name" = "ec2-2"
        }
      ~ vpc_security_group_ids               = [
          + "sg-0394c2f243340317e",
            # (1 unchanged element hidden)
        ]
        # (31 unchanged attributes hidden)

        # (8 unchanged blocks hidden)
    }

  # aws_key_pair.internal_to_vpc will be created
  + resource "aws_key_pair" "internal_to_vpc" {
      + arn             = (known after apply)
      + fingerprint     = (known after apply)
      + id              = (known after apply)
      + key_name        = "private-public-subnets-internal"
      + key_name_prefix = (known after apply)
      + key_pair_id     = (known after apply)
      + key_type        = (known after apply)
      + public_key      = "ssh-rsa AAAAB3NzaC1yc2EAAAADAQABAAABgQDapvL+Rfq9W60T7bDH53dcDrezT7PSn6tEg6Xk/yp5VAfc+uTjYgCyy1Z9CAEalFwpUD+wruY08PMFKOix8yYrEpnSX3GgIbzFvczxi6OBmOE/q1q+Ya0f1NnTx/1n3SXhD4oKfxOGdvZAcrWhpEEtCzlXrkyV8960Ek0hKzYrjYC9tXkYVuY9ZdAGeo07CbhWVjmSAIExRK7xTnR1fsxIrO39XUuiT9YTfQ4YfITs1B5pngZSUuPH+bK2Wo+EDZ4dy57biYgp1NHhhko13CTzyULwDxzieIIr9CeqdsIairSPs542aQ/rWlCzisE99iBm5fZFuysVw6UY1PixdI4YMXbBmGb51QxpgUHBfz8rIErFEz7zcBja7bgpMNo9MoD0CzoYslobjIt/QlqGw5vinHdIkteAj9SWehGq1x1V0B6niyPGre8pkBnhNPwRqt1iK9Dj6BsIhSfoFhdqjfXbIcV3oOWE92CDc6qDcYU8sI0vCLK0LDv6BQJ3IBv5Jq0= panayotismatsinopoulos@macbookpro.matsinopoulos.gr"
      + tags            = {
          + "Name" = "private-public-subnets-internal"
        }
      + tags_all        = {
          + "Name"      = "private-public-subnets-internal"
          + "project"   = "private-public-subnets"
          + "terraform" = "1"
        }
    }

Plan: 2 to add, 1 to change, 1 to destroy.
All looks good, except that the ec2-2 machine "file" and "remote-exec" blocks will not be executed because the ec2-2 machine is not created.
Nevertheless, we forget about it for awhile, and we just confirm with yes to apply the plan:
Reprovision ec2-2 Machine
If you ssh to the ec2-2 machine with the suggested command, and then you list the files inside the ~/.ssh folder, you will not see th id_rsa_internal private file.
❯ ssh -i ./id_rsa ec2-user@46.137.11.135
Last login: Mon Aug 28 08:17:46 2023 from 80.107.16.228

       __|  __|_  )
       _|  (     /   Amazon Linux 2 AMI
      ___|\___|___|

https://aws.amazon.com/amazon-linux-2/
[ec2-user@ip-172-18-0-21 ~]$ ls -l ~/.ssh/
total 4
-rw------- 1 ec2-user ec2-user 576 Aug 28 07:55 authorized_keys
[ec2-user@ip-172-18-0-21 ~]$
This is because the previous plan execution didn't trigger the "file" and "remote-exec" blocks.
We can trigger the recreation of the ec2-2 machine with the following command:
$ terraform taint aws_instance.ec2_2 && terraform apply
...
So, we basically flag the ec2-2 machine as tainted. This means that the following terraform apply will suggest to recreate the machine.
# aws_instance.ec2_2 is tainted, so must be replaced
We confirm the suggested plan with yes.
Connect to ec-1 from ec-2 machine
Now, we will try to connect to the ec-1 machine from the ec-2 machine.
❯ ssh -i ./id_rsa ec2-user@34.253.170.204
The authenticity of host '34.253.170.204 (34.253.170.204)' can't be established.
ED25519 key fingerprint is SHA256:k0ohrcQIGbOnjQbakVXv9vIiLCL4FmmdNASvDJDmzCg.
This key is not known by any other names
Are you sure you want to continue connecting (yes/no/[fingerprint])? yes
Warning: Permanently added '34.253.170.204' (ED25519) to the list of known hosts.
Last login: Mon Aug 28 14:01:17 2023 from 80.107.16.228

       __|  __|_  )
       _|  (     /   Amazon Linux 2 AMI
      ___|\___|___|

https://aws.amazon.com/amazon-linux-2/
[ec2-user@ip-172-18-0-29 ~]$ ls -l ~/.ssh
total 8
-rw------- 1 ec2-user ec2-user  576 Aug 28 14:01 authorized_keys
-r-------- 1 ec2-user ec2-user 2459 Aug 28 14:01 id_rsa_internal
[ec2-user@ip-172-18-0-29 ~]$ ssh -i ~/.ssh/id_rsa_internal ec2-user@172.18.0.10
The authenticity of host '172.18.0.10 (172.18.0.10)' can't be established.
ECDSA key fingerprint is SHA256:8F4nNIpnZopyP0JhUjMd9Ked8pTgTV/wq6FcfNeGMDU.
ECDSA key fingerprint is MD5:43:1b:71:7a:39:5a:76:51:2c:a7:60:d9:19:2e:02:ed.
Are you sure you want to continue connecting (yes/no)? yes
Warning: Permanently added '172.18.0.10' (ECDSA) to the list of known hosts.

       __|  __|_  )
       _|  (     /   Amazon Linux 2 AMI
      ___|\___|___|

https://aws.amazon.com/amazon-linux-2/
[ec2-user@ip-172-18-0-10 ~]$
Congratulations! 🥳 We have managed to connect to ec-1 machine via the ec-2 machine.
Step 9 - Access Public Internet from ec-1
But, what if we wanted to access public Internet from the ec2-1 machine which is in the private subnet?
Currently, this is not possible. For example, if you try the command ping 8.8.8.8 from within an ec2-1 shell, you will see that it will fail.
This is because there is no route that would take packets from private subnet to external world.
In this final step, we will make sure that the ec2-1 machine can access public Internet.
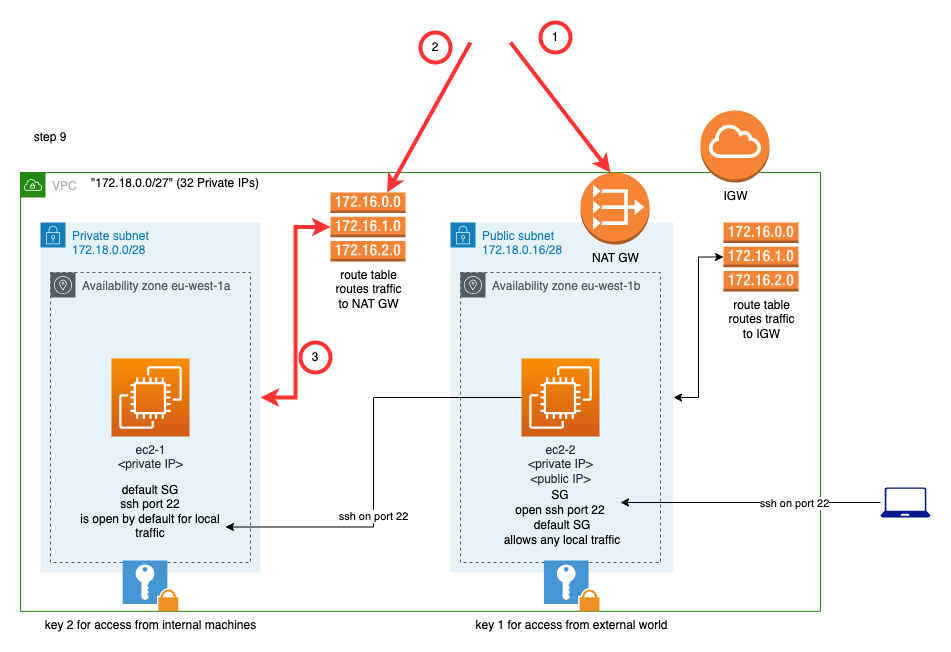
As you can see from the picture above:
- We will need to create a NAT Gateway. The NAT gateway translates packets from a private IP to a public one, and the other way around, so that private IP machines to be able to communicate with public machines. Note that the NAT will have to be created to the public subnet.
- We will have to create a new Route Table with a route that will send
0.0.0.0/0destination traffic to the NAT Gateway. - Then we will have to associate the new Route Table to the private subnet that we want outgoing traffic to the NAT Gateway.
Provision the NAT Gateway
We create the file [nat_gateway.tf]:
Note that the NAT needs to be assigned a permanent public IP address. We use the resource aws_eip to create an Elastic IP Address.
Then we use the resource aws_nat_gateway to create the NAT. Note that the connectivity type needs to be public. The private NAT Gateways are used to serve other purposes. You can read about their differences here.
Note how we set the subnet_id to point to the public subnet, the subnet number 2.
Provision The Route Table
We create the file route_table_to_nat_gateway.tf:
We already know how to create Route Tables with routes. Look how we specify that the outgoing traffic to 0.0.0.0/0 is going to be sent to the NAT Gateway.
Provision Association of Route Table to Private Subnet
Finally, we amend the contents of the vpc_subnets.tf file to have the following entry:
resource "aws_route_table_association" "to_nat_gateway" {
    subnet_id      = aws_subnet.subnet_1.id
    route_table_id = aws_route_table.to_nat_gateway.id
}
This will make sure that the Route Table is associated to the private subnet.
Apply The Plan
We are ready to apply the plan:
$ terraform apply
...
This is the plan that is suggested:
  # aws_eip.nat_gateway will be created
  + resource "aws_eip" "nat_gateway" {
      + allocation_id        = (known after apply)
      + association_id       = (known after apply)
      + carrier_ip           = (known after apply)
      + customer_owned_ip    = (known after apply)
      + domain               = (known after apply)
      + id                   = (known after apply)
      + instance             = (known after apply)
      + network_border_group = (known after apply)
      + network_interface    = (known after apply)
      + private_dns          = (known after apply)
      + private_ip           = (known after apply)
      + public_dns           = (known after apply)
      + public_ip            = (known after apply)
      + public_ipv4_pool     = (known after apply)
      + tags_all             = {
          + "project"   = "private-public-subnets"
          + "terraform" = "1"
        }
      + vpc                  = (known after apply)
    }

  # aws_nat_gateway.private_and_public_subnets will be created
  + resource "aws_nat_gateway" "private_and_public_subnets" {
      + allocation_id        = (known after apply)
      + association_id       = (known after apply)
      + connectivity_type    = "public"
      + id                   = (known after apply)
      + network_interface_id = (known after apply)
      + private_ip           = (known after apply)
      + public_ip            = (known after apply)
      + subnet_id            = "subnet-00087d63834b41f2d"
      + tags                 = {
          + "Name" = "private-public-subnets"
        }
      + tags_all             = {
          + "Name"      = "private-public-subnets"
          + "project"   = "private-public-subnets"
          + "terraform" = "1"
        }
    }

  # aws_route.to_nat_gateway will be created
  + resource "aws_route" "to_nat_gateway" {
      + destination_cidr_block = "0.0.0.0/0"
      + id                     = (known after apply)
      + instance_id            = (known after apply)
      + instance_owner_id      = (known after apply)
      + nat_gateway_id         = (known after apply)
      + network_interface_id   = (known after apply)
      + origin                 = (known after apply)
      + route_table_id         = (known after apply)
      + state                  = (known after apply)
    }

  # aws_route_table.to_nat_gateway will be created
  + resource "aws_route_table" "to_nat_gateway" {
      + arn              = (known after apply)
      + id               = (known after apply)
      + owner_id         = (known after apply)
      + propagating_vgws = (known after apply)
      + route            = (known after apply)
      + tags             = {
          + "Name" = "access-to-nat-gateway"
        }
      + tags_all         = {
          + "Name"      = "access-to-nat-gateway"
          + "project"   = "private-public-subnets"
          + "terraform" = "1"
        }
      + vpc_id           = "vpc-0738edea58dba44bb"
    }

  # aws_route_table_association.to_nat_gateway will be created
  + resource "aws_route_table_association" "to_nat_gateway" {
      + id             = (known after apply)
      + route_table_id = (known after apply)
      + subnet_id      = "subnet-0f98734bdcce4d290"
    }

Plan: 5 to add, 0 to change, 0 to destroy.
We confirm with yes.
Visually Confirm Results
After successful completion of the plan application, we can visually confirm some of the resources created.
For example, we can see the subnet-1 Route Table setup:
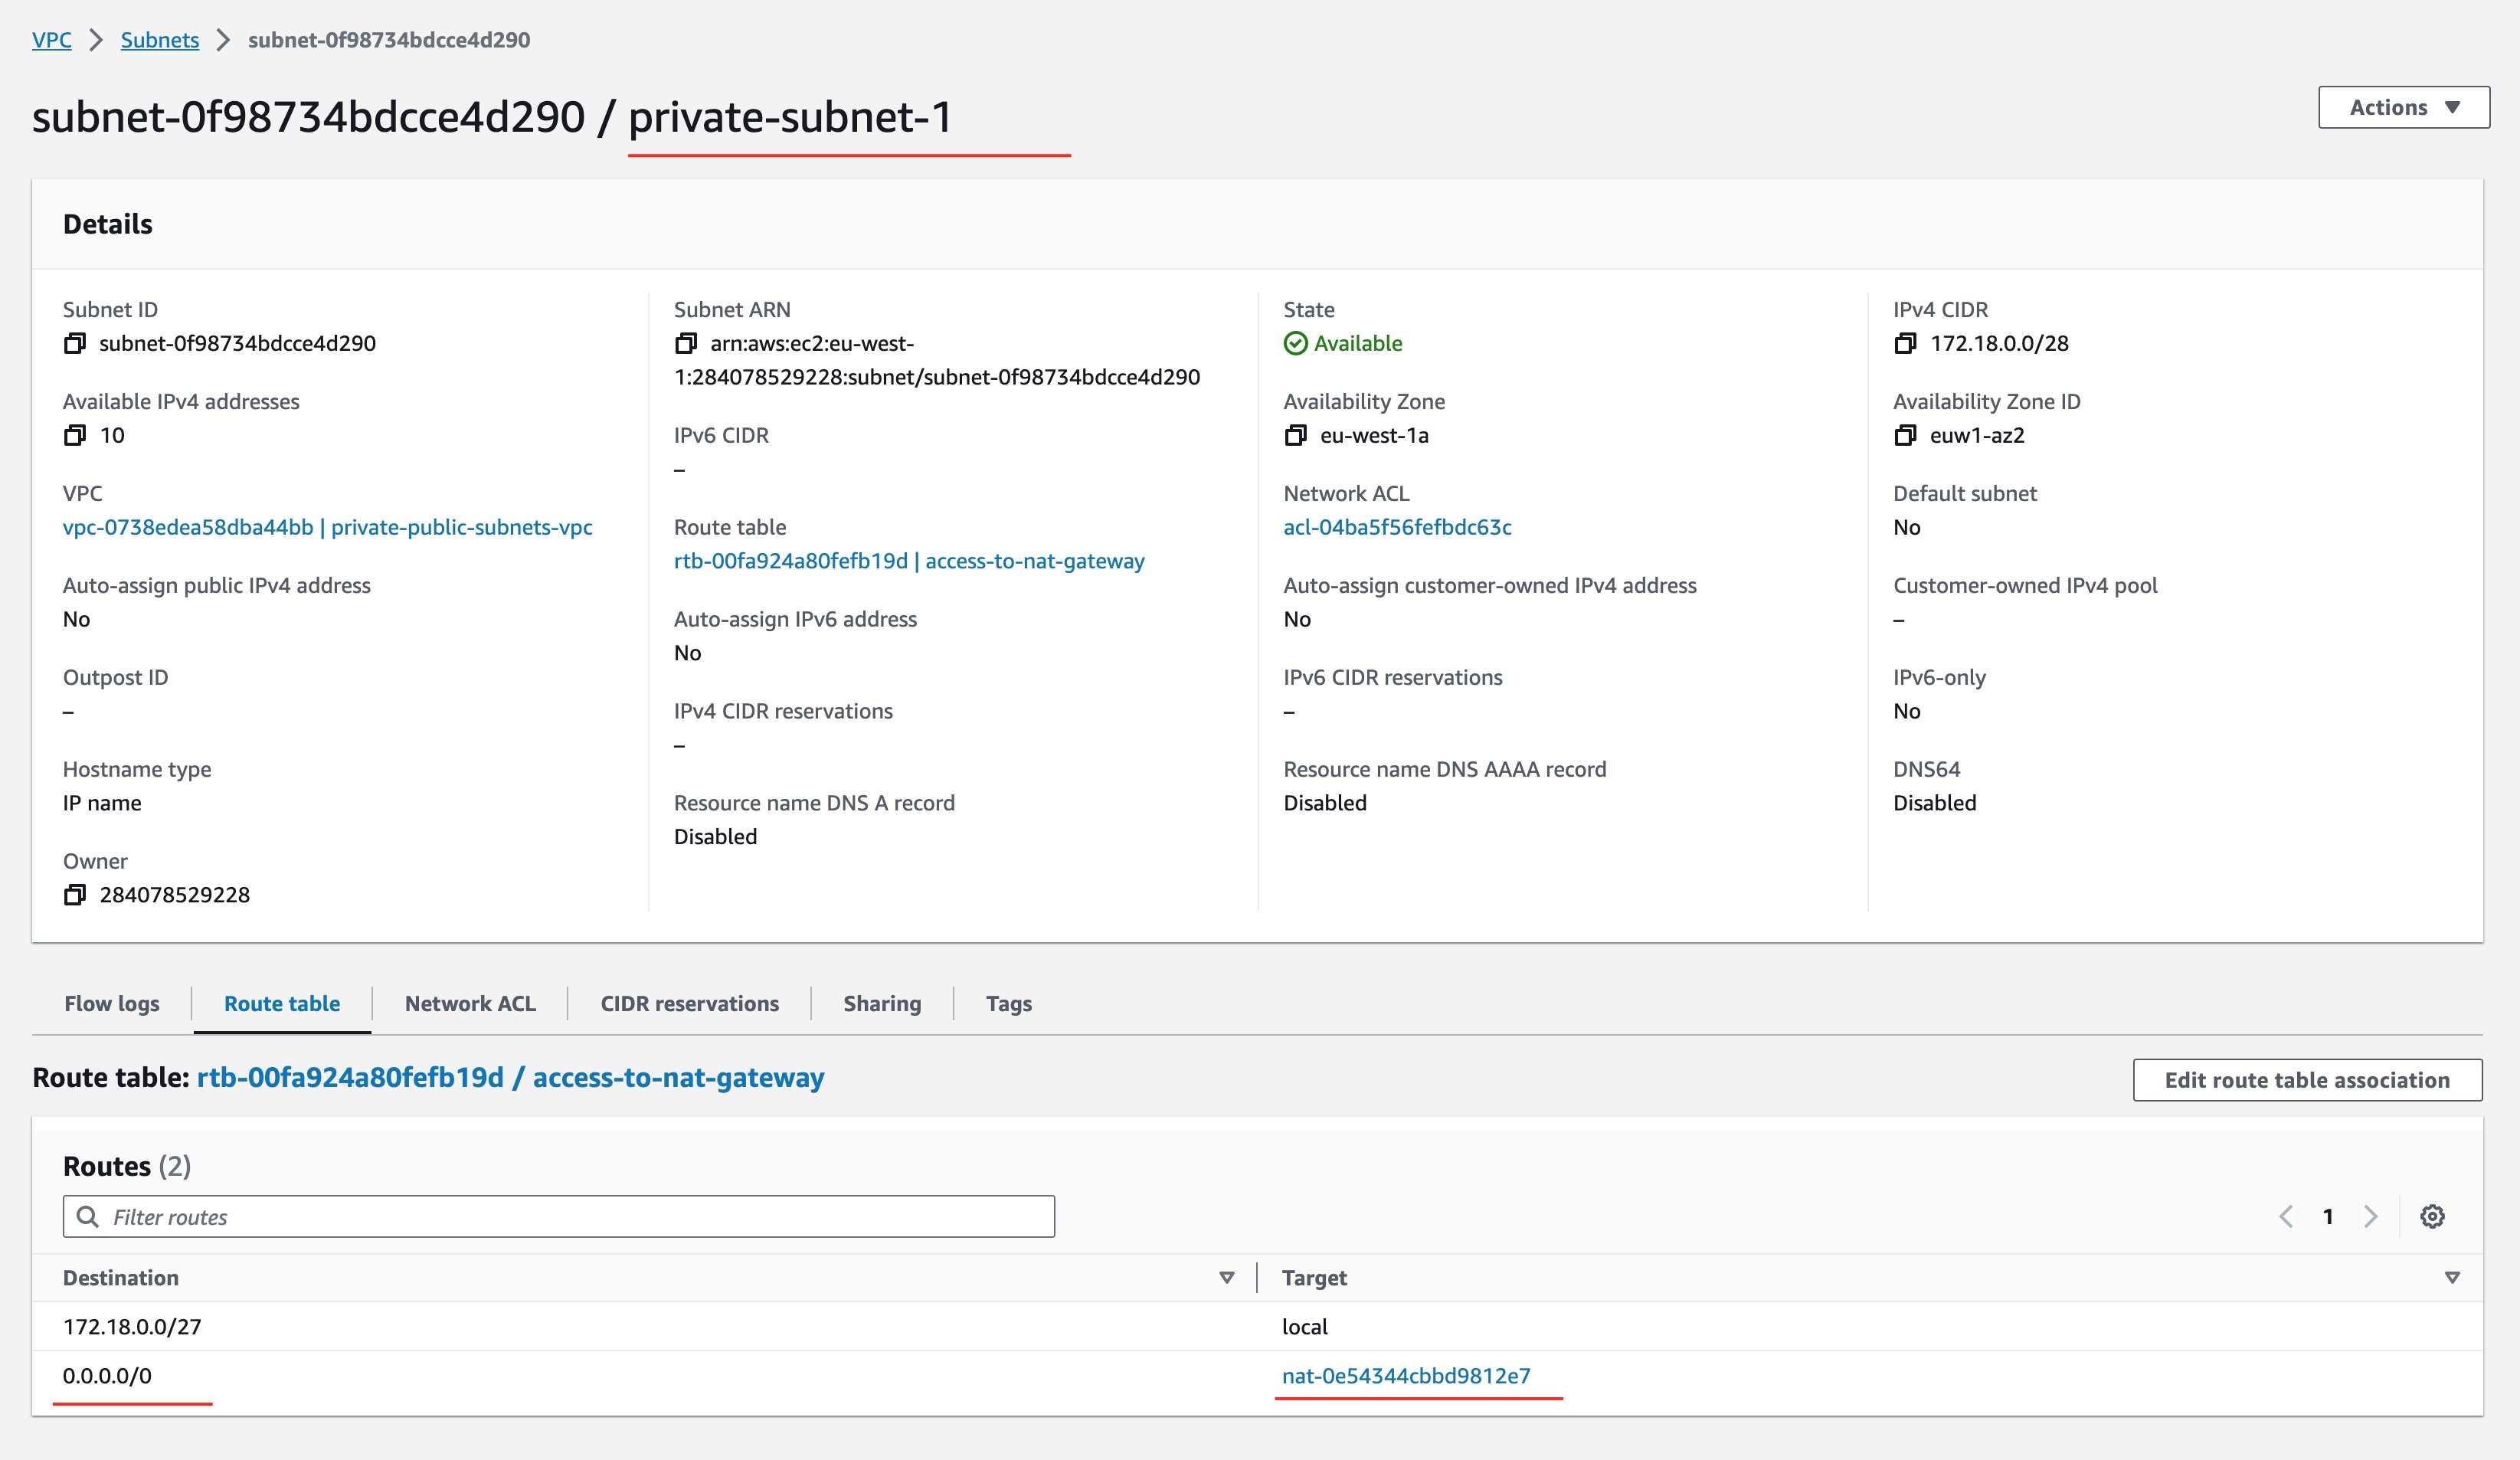
As you can see, any private IP traffic goes inside VPC (local), and any other goes to the NAT Gateway.
Check ec2-1 Machine Connectivity to Public Internet
We can also use the ssh commands to connect to the ec2-1 machine and then use the ping 8.8.8.8 to check whether the machine can access public Internet.
❯ ssh -i ./id_rsa ec2-user@34.253.170.204
Last login: Mon Aug 28 14:03:14 2023 from 80.107.16.228

       __|  __|_  )
       _|  (     /   Amazon Linux 2 AMI
      ___|\___|___|

https://aws.amazon.com/amazon-linux-2/
[ec2-user@ip-172-18-0-29 ~]$ ssh -i ~/.ssh/id_rsa_internal ec2-user@172.18.0.10
Last login: Mon Aug 28 14:03:29 2023 from ip-172-18-0-29.eu-west-1.compute.internal

       __|  __|_  )
       _|  (     /   Amazon Linux 2 AMI
      ___|\___|___|

https://aws.amazon.com/amazon-linux-2/
[ec2-user@ip-172-18-0-10 ~]$ ping 8.8.8.8
PING 8.8.8.8 (8.8.8.8) 56(84) bytes of data.
64 bytes from 8.8.8.8: icmp_seq=1 ttl=55 time=1.65 ms
64 bytes from 8.8.8.8: icmp_seq=2 ttl=55 time=1.25 ms
64 bytes from 8.8.8.8: icmp_seq=3 ttl=55 time=1.23 ms
64 bytes from 8.8.8.8: icmp_seq=4 ttl=55 time=1.23 ms
64 bytes from 8.8.8.8: icmp_seq=5 ttl=55 time=1.24 ms
^C
--- 8.8.8.8 ping statistics ---
5 packets transmitted, 5 received, 0% packet loss, time 4006ms
rtt min/avg/max/mdev = 1.233/1.323/1.653/0.169 ms
[ec2-user@ip-172-18-0-10 ~]$
Well Done! 👏
IMPORTANT!
As soon as you finish with the actions suggested above, in order to avoid further AWS charges, run the following command to destroy all the resources created by these actions.
$ terraform destroy
Closing Note
This blog post explains how you can create public and private subnets in an AWS Virtual Private Cloud. It uses Terraform as the language of infrastructure specification and configuration.
I hope that this blog post helped you in understanding the subject matter. Your comments and feedback below are more than welcome.
Thank you.